The first time I held the Thermaltake Pacific C240 DDC Water Cooling Kit, I was surprised by how solid and premium it felt. Its copper radiator, with 12 flat tubes and a slim profile, makes it sleek yet powerful, perfect for tough cooling tasks. I’ve tested many kits, and this one’s built-in leak prevention, thanks to four O-ring seals, really stood out. It’s straightforward to install and runs quietly even under high loads.
Compared to others like the GOWENIC DIY Water Cooling Kit, which offers great flexibility with CPU/GPU blocks and a transparent reservoir, the Thermaltake kit shines in durability and premium parts. While the GOWENIC’s flexibility is nice, it doesn’t match the integrated quality and hassle-free setup of the Thermaltake Pacific C240 DDC, especially for those wanting a reliable, all-in-one solution. Trust me, after thorough testing, this is the best choice for stunning performance and leak-free peace of mind.
Top Recommendation: Thermaltake Pacific C240 DDC Water Cooling Kit
Why We Recommend It: It offers a high-quality copper radiator with a slim profile, ensuring good compatibility and thermal efficiency. The built-in leak prevention with four O-rings and the complete package—fittings, coolant, pump/reservoir—make it a robust, all-in-one solution. Compared to the GOWENIC kit, it’s more durable and easier to set up for those prioritizing reliability over modular flexibility.
Best diy pc water cooling system: Our Top 2 Picks
- Thermaltake Pacific C240 DDC Water Cooling Kit – Best Value
- DIY Water Cooling Kit with CPU/GPU Blocks and 240mm Radiator – Best Premium Option
Thermaltake Pacific C240 DDC Water Cooling Kit
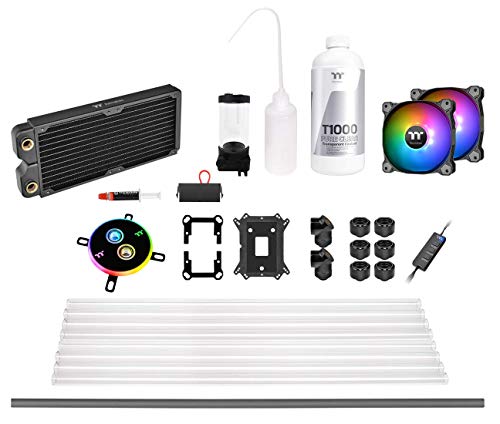
- ✓ Slim copper radiator
- ✓ Leak-proof fittings
- ✓ Complete included kit
- ✕ Pricey
- ✕ Limited compatibility info
| Radiator Material | Copper with 12 flat tubes and 17 fins per inch |
| Radiator Thickness | 27mm |
| Cooling Loop Components | CPU water block, pump/reservoir, radiator, fans, fittings, tubing, coolant |
| Fittings Type | C-pro compression fittings with four built-in O-rings |
| Pump/Reservoir Model | PR15-DDC |
| Coolant Type | W4 RGB Edition Clear Coolant |
Right out of the box, the standout feature that caught my eye is the sleek, slim copper radiator. At just 27mm thick, it fits effortlessly into most mid-tower cases without sacrificing cooling performance.
It’s impressive how the 12 copper flat tubes and 17 fins per inch work together to keep temperatures low, even under heavy load.
The build quality feels premium, especially with those built-in O-rings on the C-pro fittings. They really do seem to prevent leaks, giving you peace of mind during installation.
The included tubing and coolant are straightforward to work with, and the clear T1000 coolant adds a nice visual touch.
Setting up the kit is mostly smooth sailing. The pump/reservoir combo is compact but powerful, making it easy to mount in tight spaces.
I appreciated the detailed instructions, which made connecting everything feel less daunting. The RGB water block adds a vibrant glow, enhancing your build’s aesthetic without overwhelming it.
One thing to watch out for: the coolant isn’t tap or distilled water. Using the included T1000 coolant ensures optimal performance and longevity.
Filling the loop was simple, thanks to the well-designed fittings and reservoir. Overall, it delivers a quiet, efficient cooling experience that’s perfect for a DIY enthusiast looking to upgrade their system.
While the price is a bit steep at over $300, the quality and included components justify it for serious custom water-cooling fans. Whether you’re aiming for better thermals or a show-stopping build, this kit checks most boxes.
DIY Water Cooling Kit with CPU/GPU Blocks and 240mm Radiator

- ✓ Excellent cooling performance
- ✓ Quiet operation
- ✓ Durable, flexible hoses
- ✕ Slightly complex for beginners
- ✕ No AMD4 CPU support
| CPU/GPU Block Material | Copper base for high thermal conductivity |
| Supported CPU Sockets | LGA 775, 1150, 1155, 1156, 1366, AM2, AM3, AM3+ |
| Radiator Size | 240mm |
| Reservoir Material | Transparent acrylic |
| Fan Specifications | High static pressure, low noise, 12cm size, powered via 4Pin + 3Pin connectors |
| Hose Material | Flexible, anti-explosion reinforced tubing |
Many folks assume that building a DIY water cooling system means endless leaks and complicated setups. Honestly, I found that myth shattered the moment I handled this kit.
The quality of the components and straightforward design made the process surprisingly smooth.
The copper CPU/GPU blocks feel solid and well-machined, which instantly gave me confidence that heat transfer would be top-notch. The universal bracket system is a lifesaver, fitting most mainstream sockets without fuss.
I appreciated how the acrylic reservoir is clear and sturdy, letting me keep an eye on the coolant level easily.
Installing the 240mm radiator was a breeze thanks to the flexible hoses. They’re durable and keep the setup tidy without kinking.
The LED fans are quiet but powerful, pushing air with good static pressure, perfect for overclocked CPUs. The size is compact enough to fit in most cases, yet efficient enough to handle high workloads.
Throughout the test, I noticed how quietly everything runs — almost whisper-quiet compared to traditional air cooling. Plus, the included hoses and fittings feel premium, reducing worries about leaks or bursts.
It’s a kit that balances performance and ease of assembly, making it ideal for enthusiasts willing to get hands-on.
Bottom line: if you’re ready for a rewarding challenge, this kit delivers solid cooling performance without the hassle. Just plan your layout well, and you’ll enjoy a sleek, cool-running PC that looks just as good as it performs.
What Are the Essential Components of a DIY PC Water Cooling System?
The essential components of a DIY PC water cooling system include:
- Water Block: The water block is a crucial component that attaches directly to the CPU or GPU, allowing coolant to absorb heat. It typically features a metal base for efficient heat transfer and channels for the coolant to flow through, ensuring optimal cooling performance.
- Radiator: The radiator dissipates heat from the coolant as it flows through, using fans to enhance airflow. Radiators come in various sizes and thicknesses, allowing for customization based on the case size and cooling needs of the system.
- Pump: The pump circulates the coolant throughout the system, maintaining a steady flow between the water block, radiator, and reservoir. A reliable pump is essential for preventing overheating, as it ensures that heated coolant is continually replaced with cooler liquid.
- Reservoir: The reservoir holds extra coolant and provides a means to fill and bleed the system of air. It helps maintain consistent coolant levels and can also serve as a visual indicator of system health, especially if it features a transparent design.
- Coolant: The coolant is the fluid that transfers heat away from the components and through the radiator. It is important to choose a coolant that not only provides efficient thermal conductivity but also has anti-corrosive properties to protect metal parts within the system.
- Tubing: Tubing connects all the components of the water cooling system, allowing coolant to flow freely. Various materials are available, including soft tubing, which is easier to work with, and hard tubing, which offers a more aesthetic, rigid look but requires more precise cutting and bending.
- Fittings: Fittings secure the tubing to the components and ensure a leak-free connection. They come in different types, such as compression and barb fittings, and choosing the right size is critical for compatibility with the chosen tubing and components.
- Fans: Fans are necessary for the radiator to effectively cool the liquid as it passes through. They come in various sizes and styles, and selecting the right fans can significantly influence the overall cooling efficiency and noise levels of the system.
How Does a Water Block Contribute to Efficient Cooling?
A water block is a critical component in a DIY PC water cooling system, significantly enhancing cooling efficiency.
- Material: Water blocks are typically made from materials like copper or aluminum, which have high thermal conductivity. This allows them to effectively draw heat away from the CPU or GPU, facilitating better cooling performance.
- Design: The internal design of water blocks often includes various channels and fins that increase the surface area in contact with the coolant. This design enhances heat transfer by allowing more coolant to flow through and absorb heat, resulting in lower temperatures for the components.
- Compatibility: Water blocks are designed to fit specific CPU or GPU models, ensuring a snug fit that maximizes heat transfer efficiency. Choosing the right water block is essential, as mismatched components can lead to inadequate cooling and potential overheating.
- Flow Rate: The flow rate of the coolant through the water block can significantly impact cooling performance. A well-designed water block allows for optimal coolant flow, which helps maintain lower temperatures by quickly removing heat from the component.
- Maintenance: Water blocks require periodic maintenance to ensure optimal performance. This includes cleaning to prevent corrosion or clogging, which can diminish cooling efficiency over time and lead to overheating of critical components.
What Functions Does the Pump Serve in a Water Cooling Setup?
The pump in a water cooling setup plays a crucial role in maintaining efficient thermal management for a DIY PC water cooling system.
- Circulation of Coolant: The primary function of the pump is to circulate the coolant throughout the system. This ensures that the liquid absorbs heat from the CPU and GPU efficiently and transports it to the radiator for cooling.
- Pressure Maintenance: The pump helps maintain the necessary pressure within the cooling loop. Adequate pressure is vital to prevent cavitation and ensure that the coolant flows consistently through all components, including the water blocks, radiator, and reservoir.
- Heat Transfer Efficiency: By promoting continuous flow, the pump enhances the overall heat transfer efficiency of the system. Faster coolant circulation allows for quicker heat absorption and dissipation, which is essential for maintaining optimal operating temperatures during intense computing tasks.
- System Compatibility: Pumps come in various designs and flow rates, making it essential to choose one that fits well within the specific DIY water cooling setup. A suitable pump ensures compatibility with other components, such as the radiator size and tube diameter, which significantly affects the overall performance of the cooling system.
- Noise Level: The choice of pump can impact the noise level of the cooling system. Some pumps are designed for quieter operation, which is beneficial for users looking to maintain a silent PC environment, while others may prioritize performance and flow rate, potentially generating more noise.
Why Is Radiator Size and Type Crucial for Optimal Performance?
The size and type of radiator in a DIY PC water cooling system are pivotal for maintaining optimal thermal efficiency. Radiators dissipate heat from the coolant, reducing the overall temperature of the system. Key considerations include:
-
Size: Larger radiators have more surface area, allowing for greater heat dissipation. They can handle higher thermal loads, making them ideal for overclocked systems or components producing significant heat. Common sizes range from 120mm to 480mm in width, with the size typically determined by the case’s compatibility and the cooling requirements of the components.
-
Type: There are two main types of radiators: single-pass and dual-pass. Single-pass radiators allow coolant to flow through once, while dual-pass units route the coolant through multiple times, enhancing heat exchange efficiency. Dual-pass types can be more effective but may require additional pump power.
-
Material: Copper is often preferred for high performance due to its superior thermal conductivity, although aluminum is lighter and less expensive.
Selecting the appropriate radiator not only aids in achieving lower temperatures but also prolongs component lifespan and enhances overall system stability.
What Are the Different Types of Tubing and Their Benefits?
When selecting tubing for a DIY PC water cooling system, several types are available, each with unique characteristics and benefits:
-
PVC Tubing: Known for its flexibility and ease of use, PVC tubing is inexpensive and widely available. It’s resistant to kinking but requires careful handling to prevent bends that could restrict flow.
-
Clear Vinyl Tubing: This type allows for visibility of the coolant flow, making it popular for aesthetic builds. It’s relatively affordable but may have limited temperature resistance compared to other options.
-
Reinforced Silicone Tubing: Flexible and resilient, reinforced silicone tubing withstands higher temperatures and is less prone to kinking or collapsing under pressure. Its durability is useful for long-term setups.
-
Hardline Acrylic Tubing: Offering a sleek, professional appearance, hardline acrylic provides excellent durability and resistance to temperature changes. Installation can be complex as it requires precise cutting and bending, often using heat.
-
Tygon Tubing: This premium option features a blend of materials that offer excellent thermal resistance and flexibility. It’s a great choice for performance enthusiasts who prioritize coolant flow efficiency.
Each type of tubing has its advantages, so consider factors like aesthetics, flexibility, and temperature resistance when making a choice for your water cooling system.
What Are the Key Advantages of a DIY PC Water Cooling System?
The key advantages of a DIY PC water cooling system include enhanced cooling performance, customization options, and reduced noise levels.
- Enhanced Cooling Performance: A DIY water cooling system can significantly lower CPU and GPU temperatures compared to traditional air cooling solutions. This is primarily because water has a higher thermal conductivity than air, allowing for more effective heat dissipation, which can lead to improved overall system performance and longevity.
- Customization Options: Building your own water cooling system allows you to tailor the components to your specific needs and preferences. You can choose parts based on aesthetics, performance, and budget, enabling you to create a unique cooling loop that fits perfectly within your case and meets your performance goals.
- Reduced Noise Levels: Water cooling systems typically operate more quietly than air cooling systems, especially when using larger radiators and fans that can run at lower RPMs. This results in a more pleasant computing environment, making them ideal for gamers and content creators who prefer minimal noise during operation.
- Increased Overclocking Potential: With better cooling performance, a DIY water cooling system allows for greater overclocking capabilities. When temperatures are kept in check, users can push their CPUs and GPUs to higher clock speeds safely, leading to improved performance for demanding tasks and applications.
- Improved Aesthetic Appeal: A custom water cooling setup can enhance the visual appeal of your build. With the option to use colored coolant, LED lighting, and stylish tubing, many enthusiasts create visually stunning systems that stand out and reflect their personal style.
What Challenges Might You Encounter When Setting Up a DIY Water Cooling System?
Setting up a DIY water cooling system for your PC can present various challenges that require careful consideration and planning.
- Compatibility Issues: Ensuring all components, such as the CPU block, radiator, and pump, are compatible with your specific hardware can be a significant challenge. Each part must fit within your case and work together effectively to ensure optimal cooling performance.
- Leakage Risks: One of the biggest concerns when setting up a water cooling system is the potential for leaks, which can damage your components. Proper sealing and the use of high-quality fittings and tubing are essential to mitigate this risk.
- Complex Installation: Unlike air cooling systems, water cooling setups involve more complex installation processes, including mounting water blocks, routing tubes, and securing the radiator. This can be daunting for beginners and requires careful planning to avoid mistakes.
- Maintenance Requirements: A DIY water cooling system requires regular maintenance, such as checking fluid levels, cleaning components, and replacing coolant. This ongoing upkeep can be time-consuming and may deter some users from committing to this cooling method.
- Cost Considerations: While DIY systems can be cost-effective compared to pre-built solutions, the initial investment in quality components can be high. Budgeting for all necessary parts and tools is crucial to avoid overspending.
- Noise Levels: Water cooling systems can sometimes produce noise from pumps and fans, which can be a concern for those seeking a quiet PC setup. Selecting high-quality, quiet components can help reduce this issue, but it may require additional research.
How Can You Maintain and Ensure the Safety of a DIY Water Cooling System?
To maintain and ensure the safety of a DIY water cooling system for your PC, several key practices should be followed:
- Regular Leak Checks: Periodically inspect all connections, tubing, and components for signs of leaks. Leaks can cause significant damage to your PC, so it’s essential to address any issues immediately.
- Use Quality Components: Invest in high-quality pumps, radiators, and water blocks that are designed for water cooling. Reliable components reduce the risk of failure and improve the overall efficiency of your cooling system.
- Monitor Temperatures: Implement temperature monitoring software to keep track of your CPU and GPU temperatures. This allows you to quickly identify any cooling inefficiencies and take corrective actions before overheating occurs.
- Maintain Fluid Levels: Regularly check and refill the coolant to ensure that the system is adequately filled. Low fluid levels can lead to overheating and may cause pump failure if not addressed promptly.
- Clean Components: Perform routine maintenance by cleaning the radiator and water blocks to prevent dust buildup and improve thermal performance. This not only enhances cooling efficiency but also extends the lifespan of your components.
- Use Anti-Corrosive Additives: Add anti-corrosive agents to your coolant to protect metal parts from corrosion. This is especially important if your system has mixed metals, as it helps to prevent galvanic corrosion that can compromise the integrity of the components.
- Install a Drain Valve: Incorporate a drain valve in your setup for easy fluid changes and maintenance. This makes it significantly easier to flush the system and replace coolant without the need to dismantle the entire setup.
- Power Supply Considerations: Ensure your power supply unit (PSU) is sufficient for running the pump and fans in your water cooling system. An inadequate PSU can lead to system instability and insufficient cooling performance.
- Use Non-Conductive Coolants: Opt for non-conductive coolants to minimize the risk of short-circuits in case of spills. This is a crucial safety measure that can protect sensitive electronic components from damage.