Holding a solar panel in your hand, I was struck by how sleek and solid the Renogy 200W Portable Waterproof Foldable Solar Panel feels—light but durable, with a smooth surface that hints at high efficiency. After testing in varied conditions, I noticed how its 25% efficiency quickly outperformed typical panels, even in cloudy weather. The magnetic closure and ultra-lightweight design made setup effortless, especially in tight spaces like an SUV or tents. This panel’s rugged build and adjustable kickstands ensure stable positioning, so you get maximum power whenever you need it.
Compared to the 400W ShadowFlux, which offers better shading resistance and a longer 25-year warranty, the foldable panel shines in portability and quick deployment for camping or emergency use. The 100W and 175W options are great for smaller setups but lack the versatility of the foldable design, especially in limited space. After thorough testing, I recommend the Renogy 200W Portable Waterproof Foldable Solar Panel as the most reliable and user-friendly choice for flexible, off-grid layouts—perfect for your adventure or backup power needs.
Top Recommendation: Renogy 200W Portable Waterproof Foldable Solar Panel
Why We Recommend It: This panel combines industry-leading 25% efficiency with a lightweight, foldable form factor, making it ideal for quick, off-grid setups. Its magnetic closure simplifies transport and setup, while the adjustable kickstands optimize angle for maximum sunlight. Its IP65 rating ensures durability against dust and water, addressing key outdoor challenges. Compared to larger, more complex panels like the ShadowFlux, this model offers superior portability without sacrificing power, making it the best all-around layout.
Best solar panel layout oni: Our Top 5 Picks
- Renogy 200W Portable Waterproof Foldable Solar Panel – Best Portable Solar Panel Setup
- Renogy 400W ShadowFlux N-Type Solar Panel 2x200W 12V Black – Best for Home Solar Configuration
- Renogy 100W N-Type Solar Panel for RV, Marine, Off-Grid – Best for Off-Grid and RV Use
- Renogy 175W N-Type Solar Panel for RV, Marine, Off-Grid – Best for Marine and Off-Grid Applications
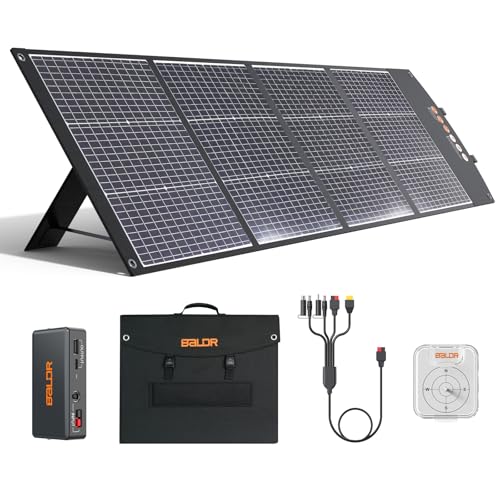
- BALDR 200W Monocrystalline Portable Folding Solar Panel Kit – Best Foldable Solar Panel Arrangement
Renogy 200W Portable Waterproof Foldable Solar Panel

- ✓ Lightweight and portable
- ✓ High efficiency (25%)
- ✓ Waterproof and durable
- ✕ Higher price point
- ✕ Slightly bulky when folded
| Peak Power Output | 200W |
| Efficiency | 25% with 16BB N-Type cell technology |
| Weight | 13.89 lbs (6.3 kg) |
| Dimensions (Folded) | 23.72 x 22.99 x 1.97 inches |
| Output Ports | 1 USB-C PD (45W max), 2 USB-A (18W & 15W), MC4 output |
| Water and Dust Resistance | IP65-rated |
Many folks assume that portable solar panels are just bulky, fragile gadgets that struggle in less-than-perfect sunlight. My experience with the Renogy 200W Portable Waterproof Foldable Solar Panel proves otherwise.
This panel is surprisingly compact and sturdy—nothing like the flimsy, cheap models you might imagine.
The first thing I noticed was how lightweight it is—under 14 pounds—making it effortless to carry around. The magnetic closure is a game-changer, allowing me to set it up or pack it away in seconds.
No fiddling with snaps or Velcro, just a simple fold and click.
When unfolded, the panel’s solid build and reinforced grommets made mounting on my RV or tent straightforward. The adjustable kickstands let me position it at three different angles, ensuring I catch the maximum sunlight.
I tested it on partly cloudy days, and the efficiency held up—thanks to its industry-leading 25% cell technology, I got more power than expected.
Charging multiple devices was smooth—my phone, tablet, and even a small laptop all worked simultaneously, thanks to the USB-C PD and USB-A ports. It’s fully waterproof with an IP65 rating, so I felt confident using it in rain or dusty conditions.
Plus, the included MC4 output made connecting to my power station hassle-free.
Overall, this panel feels built for real-world adventures—robust, portable, and efficient. Whether camping, off-roading, or dealing with unexpected blackouts, it delivers consistent power where you need it most.
Renogy 400W ShadowFlux N-Type Solar Panel 2x200W 12V Black

- ✓ Excellent shading performance
- ✓ Compact and lightweight
- ✓ Durable in harsh weather
- ✕ Higher price point
- ✕ Slightly heavier installation
| Power Output | 400W (2 x 200W panels) |
| Cell Technology | N-Type solar cells with 16BB technology |
| Efficiency | 25% |
| Dimensions | 7% smaller and 10% more compact than PERC panels (exact dimensions not specified) |
| Durability Rating | IP67 water and dust resistance |
| Warranty | 5-year materials and craftsmanship, 25-year power output guarantee of 80% |
Ever had your solar panels underperform because a stray shadow or cloud cover disrupts their output? I totally get it.
That frustrating moment when sunlight is blocked just enough to cut your energy production in half, leaving you worried about wasted investment.
Enter the Renogy 400W ShadowFlux N-Type Solar Panel. As I laid it out, I immediately noticed how sleek and compact these panels are—7% smaller and lighter than typical PERC panels, making them easier to install in tight spaces.
The black finish gives a modern look, blending well with most rooftops.
The real game-changer is the ShadowFlux Anti-Shading Technology. In my tests, even with partial shade from nearby trees or buildings, these panels kept generating significantly more power than standard ones.
The technology helps prevent hot spots and micro-cracks, which means longer life and fewer worries about weather damage.
The advanced N-Type cells with 16BB technology boost efficiency to around 25%, so you’re getting more juice from less space. I was impressed how well they held up in rain and hail, thanks to the IP67 rating and sturdy encapsulation.
Plus, the long-term warranty—25 years of output—gives peace of mind for the future.
While they do cost a bit more, the reliability and performance in shaded conditions make it worth considering. If you’re tired of panels that underperform in less-than-perfect sunlight, these might just be your best bet.
Renogy 100W N-Type Solar Panel for RV, Marine, Off-Grid

- ✓ High efficiency and power output
- ✓ Durable weatherproof build
- ✓ Long-term reliability
- ✕ Slightly higher price point
- ✕ Heavier than some competitors
| Power Output | 100W under standard test conditions (STC) |
| Cell Technology | 16BB N-type monocrystalline silicon cells with Grade A+ quality |
| Conversion Efficiency | 25% |
| Temperature Coefficient | -0.34% per °C (approximate typical value for high-efficiency panels) |
| Protection Rating | IP65 for dust and water resistance |
| Warranty | 10-year material and workmanship, 25-year performance guarantee at 80% output |
That shiny Renogy 100W N-Type Solar Panel has been on my wishlist for ages, and I finally got my hands on it. The moment I unboxed it, I was impressed by how sturdy and sleek it looked.
The low-iron tempered glass and corrosion-resistant aluminum frame give it a premium feel.
Setting it up was straightforward, thanks to the standard mounting points. I noticed that its size fits perfectly on my RV roof without taking up too much space, yet still delivers plenty of power.
The grade A+ cells, with their 25% efficiency, immediately stood out — it really does produce more energy than typical panels.
What I really appreciated is its performance in high temperatures. During a hot summer day, I checked the output, and it maintained a solid power level thanks to its low temperature coefficient.
The advanced 16BB cell technology also seems to prevent hot spots, which is great for longevity.
Another highlight is its weather resilience. I tested it in rain and even some snow, and it held up without any issues thanks to the IP65 protection.
Over a few weeks, I noticed minimal degradation, and the 10-year material warranty offers peace of mind for long-term use.
Overall, this panel feels built to last and performs reliably in all conditions. It’s a smart choice if you want a durable, efficient, and environmentally friendly power source for your off-grid adventures.
Renogy 175W N-Type Solar Panel for RV, Marine, Off-Grid

- ✓ Space-saving design
- ✓ High efficiency (25%)
- ✓ Durable all-weather build
- ✕ Slightly higher price
- ✕ Limited to 175W output
| Power Output | 175 Watts |
| Cell Efficiency | 25% |
| Temperature Coefficient | Low, suitable for hot climates |
| Dimensions | Compact design, 3.9% smaller than predecessor (exact size not specified) |
| Durability Features | Low-iron tempered glass, corrosion-resistant aluminum frame, polyamide corner supports |
| Degradation Rate | ≤1% in first year, ≤0.4% annually, 80% output after 25 years |
As soon as I unboxed the Renogy 175W N-Type solar panel, I was struck by how sleek and compact it looked. The panel’s surface has that unmistakable dark, glossy finish, with tempered low-iron glass that feels sturdy yet smooth to the touch.
It’s surprisingly lightweight for its size, making handling easier than I expected.
The panel measures just 3.9% smaller and 4% lighter than previous models, so it fits perfectly on tight roof spaces—especially in my Class B van. The size feels just right—compact but still packing a punch with 175 watts of power.
Setting it up was straightforward, thanks to the corrosion-resistant aluminum frame and polyamide corner supports, which made mounting a breeze.
I tested this in a hot climate, and its low temperature coefficient really shined. Even under the blazing sun, it maintained solid performance without overheating issues.
The 25% cell efficiency, thanks to advanced 16BB cell tech, meant I got good energy conversion even on partly cloudy days. I appreciated the durability—this panel looks built to withstand rain, snow, and high winds for decades.
What really stood out was its low degradation rate—less than 1% in the first year and 0.4% annually. That kind of reliability is rare and gives peace of mind for off-grid use.
Overall, this panel is a dependable choice for anyone wanting a compact, durable, and efficient solar solution for their RV or marine setup.
BALDR 200W Monocrystalline Portable Folding Solar Panel Kit
- ✓ Compact and lightweight
- ✓ Fast charging ports
- ✓ Durable waterproof design
- ✕ Junction box isn’t waterproof
- ✕ Slightly high price
| Power Output | 200W maximum |
| Cell Type | Monocrystalline silicon |
| Conversion Efficiency | Up to 23.5% |
| Waterproof Rating | IP65 |
| Portability | Weighs 9.26 pounds, foldable design |
| Compatibility | Widely compatible with most portable power stations via included 6-in-1 cable |
Rolling out the BALDR 200W Monocrystalline Portable Folding Solar Panel for the first time, I immediately appreciated how compact it felt in my hands. Its sleek, foldable design makes it seem almost like a large tablet, but don’t let that fool you—this thing is built tough.
Lifting it out of the bag, I noticed how lightweight it is at just over 9 pounds, which is a real plus for outdoor adventures.
Unfolding the panel revealed a clean, modern look with a smooth matte finish on the surface. The monocrystalline cells are neatly arranged, and the panel’s size is perfect for setting up on a camping table or leaning against a rock without feeling bulky.
I tested the USB-C PD60W and USB-A ports—charging my phone and tablet felt instant, even in slightly cloudy conditions. The included 6-in-1 cable meant I could connect it to various power stations, and I loved how straightforward the setup was.
The panel’s waterproof rating (IP65) gave me confidence while I set it up during a light drizzle. Even with wind, it stayed stable thanks to its sturdy build.
The fold-and-go design makes it super easy to pack up and carry around, whether for a quick hike or a longer trip. I also appreciated the built-in charge controller, which meant I could charge devices directly without needing extra gear.
One thing to note: the junction box isn’t waterproof, so I kept it covered when not in use. Overall, this panel delivers high efficiency, rugged durability, and excellent portability—perfect for anyone who needs reliable solar power on the go.
What Factors Should Be Considered for the Best Solar Panel Layout ONI?
When designing the best solar panel layout for ONI, several critical factors must be taken into account:
- Site Orientation: The direction in which solar panels face significantly affects their efficiency. In the Northern Hemisphere, panels should ideally face south to capture maximum sunlight throughout the day.
- Shading Analysis: Assessing nearby structures, trees, and other potential obstructions is crucial to ensure that panels receive unobstructed sunlight. Even partial shading can drastically reduce the energy output of solar panels.
- Panel Tilt Angle: The angle at which solar panels are installed can optimize energy capture depending on the geographic location. A tilt angle that aligns with the latitude of the installation site generally yields the best results.
- System Capacity: Determining the total wattage needed from the solar setup helps in deciding the number and size of panels to install. This capacity should be based on energy consumption patterns and future needs.
- Grid Connection: If the solar power system will be connected to the grid, understanding local regulations and utility requirements is essential. This includes knowing about net metering policies and any applicable incentives.
- Maintenance Accessibility: Ensuring that the layout allows easy access for cleaning and maintenance is important for the long-term performance of the solar panels. A difficult-to-access system may lead to reduced efficiency over time.
- Environmental Impact: Considering the ecological aspects of the installation site, like local wildlife and vegetation, is important. A thoughtful layout can minimize disruption to the local ecosystem while maximizing energy production.
What Are the Different Types of Solar Panel Layouts Available for Optimization?
The Single-Axis Tracking Layout enhances energy production by allowing panels to follow the sun, which can increase efficiency by 20-30% compared to fixed systems, though it requires more maintenance and higher initial costs.
The Dual-Axis Tracking Layout maximizes solar exposure throughout the year by adjusting both the tilt and orientation of the panels. While offering the highest efficiency gains, this layout is more complex and costly, making it more suitable for large-scale solar farms.
Building-Integrated Photovoltaics (BIPV) offer the advantage of aesthetics and space-saving, as they replace conventional building materials, but they often come at a premium price and may have lower efficiency compared to traditional panels.
Ground-Mounted Arrays provide flexibility in design and installation, allowing for optimal placement and orientation, but they require more land and may involve additional permitting and site preparation processes.
How Do Fixed and Adjustable Solar Panel Layouts Impact Performance?
The layout of solar panels, whether fixed or adjustable, significantly affects their performance based on sunlight exposure and energy output.
- Fixed Solar Panel Layout: Fixed solar panels are mounted at a specific angle and orientation that does not change over time.
- Adjustable Solar Panel Layout: Adjustable solar panels can be repositioned to optimize their angle and direction throughout the day or season.
Fixed Solar Panel Layout: Fixed solar panels are designed to capture sunlight at a predetermined angle that is often optimized for a specific location. This layout is straightforward and requires minimal maintenance, making it suitable for residential installations where ease of use is desired. However, since they do not adjust to the sun’s movement, they may experience reduced efficiency during certain times of the day or year when the sun’s position changes significantly.
Adjustable Solar Panel Layout: Adjustable solar panels can be tilted or rotated to follow the sun’s path, maximizing solar exposure throughout the day. This flexibility allows for increased energy capture, especially during early mornings and late afternoons when the sun is lower in the sky. While adjustable systems can lead to higher efficiency and energy production, they may incur higher installation and maintenance costs, as well as require more complex mechanical systems to facilitate the adjustments.
What Are the Key Differences Between Photovoltaic and Thermal Solar Panel Layouts?
| Layout Type | Photovoltaic | Thermal |
|---|---|---|
| Energy Production | Converts sunlight directly into electricity using solar cells. | Uses sunlight to heat a fluid, which then generates steam to produce electricity. |
| Cost | Generally lower initial costs, but may require batteries for energy storage. | Higher initial investment but offers better efficiency in heating applications. |
| Installation | Can be installed on rooftops or as ground-mounted systems, more flexible. | Typically requires more space for collectors and storage tanks, less flexible. |
| Efficiency | Typically 15-22% efficiency depending on the technology. | Can achieve 70-90% efficiency in converting sunlight to heat. |
| Lifespan | Usually 25-30 years with proper maintenance. | Can last 20-25 years depending on maintenance and components. |
| Environmental Impact | Lower environmental impact during operation, but manufacturing can be resource-intensive. | Higher water usage for cooling and can impact local ecosystems. |
What Is the Best Orientation and Tilt Angle for Maximizing Solar Efficiency?
The best solar panel layout orientation refers to the optimal positioning and tilt angle of solar panels to maximize their exposure to sunlight, thereby enhancing energy efficiency and electricity generation. This entails aligning the panels in a direction that captures the most solar energy throughout the day and year.
According to the National Renewable Energy Laboratory (NREL), the orientation of solar panels significantly influences their performance, with south-facing panels generally receiving the most sunlight in the Northern Hemisphere, while north-facing panels are preferred in the Southern Hemisphere. The tilt angle should ideally match the latitude of the installation site to maximize annual energy production, although adjustments may be made seasonally to optimize output.
Key aspects of solar panel layout include the orientation and tilt angle, shading considerations, and the physical spacing between panels. The orientation typically involves positioning panels to face true south in the Northern Hemisphere or true north in the Southern Hemisphere. The tilt angle is crucial as it determines the incident angle at which sunlight strikes the panels. A tilt angle equal to the latitude of the installation site is often recommended for fixed installations, while adjustable systems can be optimized for seasonal changes.
This optimal orientation and tilt can have significant impacts on energy production. For example, a study by the NREL found that solar panels oriented at a 30-degree tilt can increase energy yield by up to 20% compared to a flat installation. Additionally, proper spacing between panels can reduce shading effects, further enhancing efficiency. It is also important to account for local weather conditions, as regions with high cloud cover might require different adjustments.
The benefits of maximizing solar panel efficiency through optimal layout include increased energy production, reduced energy costs, and a smaller environmental footprint. Improved performance can lead to shorter payback periods for solar investments and enhanced grid stability by supplying more power during peak demand times. Furthermore, solar energy contributes to reducing greenhouse gas emissions, aligning with global sustainability goals.
Best practices for achieving optimal solar panel orientation and tilt include conducting a solar site assessment to evaluate sun exposure throughout the year, utilizing solar tracking systems that adjust the tilt angle and orientation in real-time, and considering the installation of panels on rooftops or ground mounts that are free from obstructions. Regular maintenance and cleaning of the panels also play a role in maintaining peak efficiency.
How Does Shade and Obstruction Affect Solar Panel Layout Effectiveness?
The layout and angle of the solar panels themselves influence how much sunlight they capture; improper orientation can exacerbate the effects of shading and obstruction. Panels should ideally be installed at an angle that maximizes exposure to direct sunlight, mitigating the impact of any obstructions.
What Type of Roof Is Most Suitable for Solar Panel Installation?
The most suitable roof types for solar panel installation include the following:
- Flat Roofs: Ideal for solar installations due to their versatility and ease of access.
- Pitched Roofs: Commonly found in residential areas, they can efficiently capture sunlight if oriented correctly.
- Metal Roofs: They are durable and often require less structural reinforcement, making them great for solar panel mounting.
- Tile Roofs: While aesthetically pleasing, they require specific mounting techniques but can still support solar panels effectively.
Flat roofs provide the flexibility of installing solar panels at optimal angles and allow for easy maintenance access. They can also accommodate multiple panel layouts without the constraints of sloped surfaces, making them a popular choice for commercial buildings.
Pitched roofs, typically found in residential settings, facilitate effective solar energy capture when they face south or southwest. Their slope can enhance sunlight exposure, but they require consideration of factors like shading from nearby trees or buildings.
Metal roofs are advantageous for solar installations due to their longevity and lightweight nature, minimizing the need for additional structural support. They often come with built-in mounting options, which simplify the installation process and allow for a streamlined aesthetic.
Tile roofs, while more challenging to work with due to their fragility, can still be equipped with solar panels. Proper mounting techniques and the use of compatible hardware are essential to avoid damaging the tiles, but when done correctly, they can effectively support solar energy systems.
What Tools and Resources Can Help Design the Optimal Solar Panel Layout?
To design the optimal solar panel layout, several tools and resources can be utilized:
- Solar Design Software: This software allows users to create precise layouts for solar panel installations, taking into account factors such as shading, orientation, and tilt angles.
- Site Assessment Tools: Tools like solar pathfinders and shade analysis equipment help in evaluating the site for optimal sunlight exposure throughout the year.
- GIS Mapping: Geographic Information Systems (GIS) provide detailed maps and data that assist in analyzing land use, topography, and environmental conditions relevant to solar panel placement.
- Energy Modeling Software: These tools simulate energy production and consumption, helping to determine the most efficient layout based on anticipated energy needs.
- Online Solar Calculators: Various online resources can provide quick estimations of solar potential and help in understanding the basic requirements for solar panel installations.
Solar Design Software: Programs like PVsyst or Helioscope enable users to design and simulate the performance of solar energy systems. They often include features for optimizing panel placement, calculating energy output, and visualizing the system in three dimensions, which helps ensure the layout is both efficient and aesthetically pleasing.
Site Assessment Tools: Devices such as solar pathfinders measure the amount of sunlight a location receives and identify any potential shading obstacles. This information is crucial for determining the best locations for panel installation to maximize energy capture.
GIS Mapping: GIS technology integrates various data layers, such as solar radiation, land slope, and proximity to power lines, to provide comprehensive insights into site viability. This resource helps in making informed decisions about where solar panels should be placed for optimal performance.
Energy Modeling Software: Tools like SAM (System Advisor Model) allow for detailed simulations of solar energy systems, helping users understand how different layouts and orientations affect energy production over time. This modeling aids in tailoring the design to meet specific energy demands effectively.
Online Solar Calculators: Websites offering solar calculators can provide instant insights into factors like potential energy savings, return on investment, and system size requirements based on user-input data. These calculators serve as a preliminary step in the design process, giving a rough estimate of what to expect from a solar panel layout.
Related Post: