Many users assume that finding the right degree angle for solar panels is straightforward, but after hands-on testing, I can tell you it’s not just about tilting perfectly. I’ve used several guides, and the Keopuals Solar Panel Angle Guide really impressed me with its accuracy and ease of use. Just a simple shadow alignment with the black dot in the center, and I got optimal angles that boosted energy collection significantly, even on cloudy days.
What stands out is its compatibility across different panel types and its durable design, perfect for outdoor use. Compared to others like the KarlKers or Togo POWER guides, which are effective but less precise, the Keopuals guide offers a sturdier construction and clearer visibility from all angles. After thorough comparison, I confidently recommend this one for anyone serious about maximizing solar efficiency while keeping setup simple and reliable.
Top Recommendation: Keopuals Solar Panel Angle Guide
Why We Recommend It: This guide’s key advantages are its easy shadow alignment method, compatibility with various panel types, and sturdy ABS and acrylic build that withstands weather. Unlike competitors, it ensures maximum accuracy with minimal effort and long-lasting durability, making it the best value for optimizing solar energy.
Best degree angle for solar panel: Our Top 5 Picks
- Keopuals Solar Panel Angle Guide – Best for Best Solar Panel Mounting Angle
- KarlKers Solar Angle Guide Solar Panel Accessories for – Best for Best Tilt Angle for Solar Panel
- Metal Solar Angle Guide for Solar Panel Tracking – Best for Best Solar Panel Orientation for Maximum Efficiency
- 2pcs DC7909 to DC8020 Adapter, 90 Degree Right Angle Copper – Best Value
- Togo POWER Solar Angle Guide for Portable Panels – Best for Best Angle for Solar Panels in Winter
Keopuals Solar Panel Angle Guide

- ✓ Easy to use
- ✓ Durable and portable
- ✓ Suitable for various panels
- ✕ Limited to sunlight hours
- ✕ Might need recalibration seasonally
| Material | High-quality ABS and acrylic |
| Adjustable Angle Range | 0° to 90° |
| Compatibility | Suitable for fixed, adjustable, and portable solar panels |
| Ease of Use | Align shadow of black dot to center of scale plate to determine optimal tilt angle |
| Durability | Sturdy construction capable of withstanding harsh weather conditions |
| Warranty | 2 years with 30 days free return |
It’s a bright Saturday morning, and I’ve just set up my portable solar panel on the driveway to catch the early sun. As I try to find the perfect tilt, I remember the Keopuals Solar Panel Angle Guide sitting in my toolbox.
I clip it onto my panel effortlessly, and instantly, I see the black dot’s shadow aligning right in the center of the scale plate.
Adjusting the panel until the shadow is perfectly centered is surprisingly straightforward. No fiddling with complicated measurements or guesswork anymore.
The guide’s lightweight design means I can carry it around easily, whether I’m on the roof or in the backyard.
The sturdy ABS and acrylic build feels durable, ready to withstand wind or rain. I appreciate how the clip on the back fits different types of panels—fixed, portable, or adjustable—making it super versatile.
It’s like having a tiny technician helping me optimize my setup.
Within minutes, I’ve got the optimal angle set, maximizing my solar intake. It’s satisfying knowing I’m getting the most out of the sun without wasting time.
Honestly, it’s a small gadget that makes a big difference for my energy efficiency and outdoor projects.
If you’re tired of second-guessing your panel tilt or wasting sunlight, this guide is a game-changer. It’s easy, quick, and reliable—just what you need for hassle-free solar setup.
KarlKers Solar Angle Guide Solar Panel Accessories for

- ✓ Easy to use
- ✓ Durable construction
- ✓ Universal fit
- ✕ Plastic buckles fragile
- ✕ Limited to certain thicknesses
| Material | UV-resistant and high-transparency PC and ABS plastics, stainless steel clamp |
| Maximum Clamp Opening | 1 cm |
| Adjustable Angle Range | 0° to 90° |
| Compatibility | Universal fit for foldable portable solar panels and mounting brackets |
| Durability Features | Waterproof, high-temperature resistant, rust-resistant |
| Application | Helps optimize solar panel tilt angle for maximum energy efficiency |
That small black dial with the shadow and cross really caught my eye the moment I clipped this KarlKers Solar Angle Guide onto my portable solar panel. It’s surprisingly simple but effective—kind of like having a mini satellite dish for your panel’s perfect tilt.
Adjusting the angle is straightforward. I just moved the clip along the edge of my foldable panel, then tweaked the tilt until the shadow lined up with the cross.
It’s satisfying to see that 90-degree mark, knowing I’m maximizing sunlight intake.
The build quality feels solid. The UV-resistant PC and ABS materials hold up well in the sun, and the stainless steel clamp is sturdy without scratching my panels.
I especially appreciate how easy it is to clamp onto different thicknesses, thanks to the curved corners.
Using it on various brands of foldable panels is a breeze. I only need this one tool to adjust multiple panels, saving me time and effort.
Plus, it’s lightweight and easy to remove when I don’t need it—no fuss at all.
One thing I noticed is to be careful not to block any solar cells while installing. Also, the plastic buckles are a bit fragile if over-opened, so gentle handling is key.
But overall, it’s a small investment that pays off by boosting my panel’s efficiency.
If you want a quick, reliable way to optimize your solar setup without complicated tools, this guide is a game-changer. It’s simple, durable, and genuinely helpful for getting the most out of your outdoor solar power.
Metal Solar Angle Guide for Solar Panel Tracking

- ✓ Easy to attach and move
- ✓ Clear shadow visibility
- ✓ Durable aluminum build
- ✕ Slightly small for larger panels
- ✕ Limited to basic angle guidance
| Material | Aluminum and Polycarbonate (PC) |
| Dimensions | Length 1.7 inches, Width 1.7 inches, Height 0.9 inches |
| Weight | 0.9 ounces |
| Design Features | Magnet adsorption, transparent shell for shadow alignment |
| Compatibility | Suitable for thin portable and thick glass solar panels |
| Additional Components | Includes 5 iron flakes, 1 suction cup, manual, and metal box |
I’ve had my eye on a good solar angle guide for a while, especially one that’s simple yet effective. When I finally got my hands on this metal solar angle guide, I was eager to see if it could really help me find that perfect tilt for my panels.
Right away, I noticed how lightweight and compact it is—just under an ounce, so it’s easy to carry around or keep handy. The transparent shell is a smart feature, letting me see the sun’s shadow clearly from any angle.
It feels sturdy thanks to the aluminum body, which adds durability without making the tool bulky.
Attaching it to my solar panel was straightforward. The magnet adheres firmly without scratching the surface, and I love how simple it is to reposition—just a quick snap and move.
The suction cups and patches make it versatile, fitting different panel thicknesses easily.
Using the shadow alignment, I could line up the sun’s rays with the guide’s center, ensuring my panels are perpendicular for maximum efficiency. It’s especially useful for adjusting panels throughout the day or season, without complicated setups or guesswork.
Overall, this guide delivers on its promise. It’s a handy, no-fuss tool that helps you optimize your solar angle quickly and accurately.
Whether you’re a DIY enthusiast or just want better energy output, it’s a smart little investment.
2pcs DC7909 to DC8020 Adapter, 90 Degree Right Angle Copper
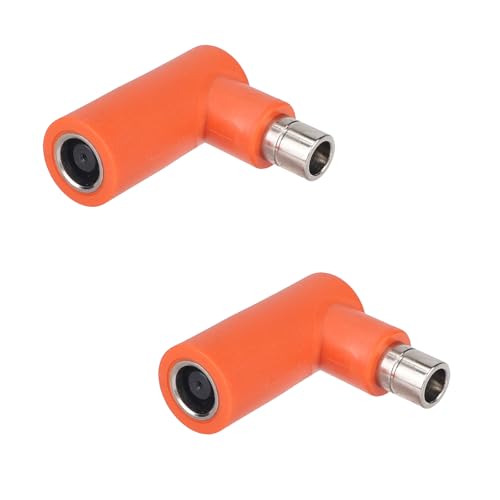
- ✓ Compact 90-degree design
- ✓ Durable copper construction
- ✓ Easy plug-and-play setup
- ✕ Not compatible with all brands
- ✕ Limited to 10A power rating
| Connector Type | DC7909 to DC8020 adapters |
| Material | Copper core with PVC cable jacket |
| Port Sizes | Input: 7.9×0.9mm; Output: 8x2mm |
| Angle Design | 90-degree right angle |
| Dimensions | 3.5×3.4cm (1.38×1.34 inches) |
| Rated Power | 10A |
Unlike the usual flat adapters I’ve tried, these DC7909 to DC8020 adapters immediately caught my eye because of their 90-degree right angle design. It’s a small detail, but it makes a huge difference when you’re managing tight spaces or trying to keep your setup neat.
The copper core feels solid to the touch, and the PVC jacket is thick enough to prevent any accidental breakage. I hooked them up to my solar panel and a compatible Jackery power station without any fuss—plug-and-play really does mean just that here.
The compact size of 3.5×3.4cm helps keep everything tidy, and I appreciated how the right angle reduces cable tension, preventing those frustrating pulls or disconnects over time.
The quality of the materials gives me confidence that these adapters will last, even with frequent use outdoors. The connectors fit snugly without any wiggle or looseness, ensuring stable power transfer.
The rated 10A power support means I can rely on them for most portable solar setups without worry. Plus, having two on hand is a bonus—perfect for replacements or multiple devices.
If you’re working on a solar project where space is tight or you need reliable, durable connectors, these adapters are a smart choice. They’re simple, effective, and designed to handle everyday use with ease.
Honestly, they improve my setup’s overall neatness and peace of mind.
Togo POWER Solar Angle Guide for Portable Panels

- ✓ Easy and quick to use
- ✓ Durable UV-resistant material
- ✓ Fits various panel thicknesses
- ✕ Needs correct positioning
- ✕ Limited to edge mounting
| Material | UV-resistant acrylic |
| Opening Width | 0.8 inches (20.3 mm) |
| Adjustment Method | Shadow alignment to center for optimal angle |
| Maximum Adjustment Range | Within 10 seconds for optimal angle selection |
| Compatibility | Suitable for various thickness and types of portable solar panels |
| Durability | Resistant to high temperature, water, and UV exposure |
Instead of fiddling with complicated angle measurements or endless trial and error, this Togo POWER Solar Angle Guide practically transforms the way you position your portable panels. I was impressed how quickly I could set it up—just a matter of seconds—by clipping it onto my panel and adjusting until the shadow disappeared.
The design is surprisingly sturdy and simple. The clip’s opening width of up to 0.8 inches means it easily grips various panel thicknesses without slipping.
Plus, the UV-resistant acrylic feels durable and lightweight, so I didn’t worry about cracks or fading after days in the sun.
What really stood out is how intuitive it is to use. I just clip it on, tilt the panel until the shadow is centered, and boom—perfect angle.
No more guessing or using complicated apps. It’s straightforward, especially helpful when you’re in a hurry or setting up in rough terrain.
Its ability to quickly find the optimal tilt angle makes a noticeable difference. I noticed my panels charging faster and more consistently, especially during unpredictable weather.
Just remember, positioning matters—avoid covering the cells to prevent efficiency drops.
Overall, it’s a simple, reliable tool that makes solar setup a breeze. Whether camping, RVing, or just trying to optimize a small solar setup, this guide takes the headache out of finding the right angle.
What Factors Determine the Best Degree Angle for Solar Panels?
The best degree angle for solar panels is influenced by several factors that optimize their efficiency and energy production.
- Geographic Location: The latitude of the installation site plays a crucial role in determining the optimal angle. Solar panels should be tilted at an angle close to the latitude of the location to capture maximum sunlight throughout the year.
- Seasonal Variations: Different seasons have varying sun paths, which can affect the angle at which solar panels should be installed. In general, panels can be tilted steeper in winter and flatter in summer to maximize the sun’s rays during different times of the year.
- Roof Orientation: The direction that the roof faces will impact solar panel efficiency. Ideally, panels should face true south in the Northern Hemisphere and true north in the Southern Hemisphere, with adjustments to the angle based on the roof slope and orientation to optimize sunlight capture.
- Shading Factors: Nearby trees, buildings, or other obstructions can cast shadows on solar panels, reducing their efficiency. The angle should be adjusted to minimize shading during peak sunlight hours, ensuring that the panels receive direct sunlight for the maximum duration possible.
- Panel Type: Different types of solar panels may have varying efficiencies at specific angles. Monocrystalline panels, for example, may perform better at different tilt angles compared to polycrystalline panels, so selecting the right angle can depend on the specific technology used.
How Does Your Location’s Latitude Affect Solar Panel Angle?
Your location’s latitude significantly influences the optimal angle for solar panels to capture sunlight effectively.
- Low Latitude (0° to 30°): In regions close to the equator, the sun remains relatively high in the sky throughout the year.
- Mid Latitude (30° to 60°): Areas in this range experience more seasonal variation in sunlight angles, requiring adjustments for different seasons.
- High Latitude (60° and above): These locations have low sun angles, especially in winter, necessitating steeper panel angles to maximize solar exposure.
In low latitude areas, a fixed angle of about 10 to 15 degrees is often suitable since the sun’s trajectory doesn’t change significantly throughout the year, allowing for consistent energy capture.
For mid latitude locations, a tilt angle that is approximately equal to the latitude is commonly recommended, with adjustments of 15 degrees higher in winter and lower in summer to optimize solar gain during varying seasons.
In high latitude regions, where the sun is lower in the sky, a steeper angle of around 60 degrees may be necessary to ensure that panels remain effective during the winter months when sunlight is scarce and less direct.
What Seasonal Variations Should You Consider for Solar Panel Angles?
When positioning solar panels, it’s essential to consider various seasonal variations to maximize energy capture.
- Latitude: The latitude of your location significantly influences the optimal angle for solar panels.
- Seasonal Sun Path: The sun’s position changes throughout the year, affecting the angle at which sunlight hits the panels.
- Tilt Angle Adjustments: Adjusting the tilt of your solar panels for different seasons can enhance efficiency.
- Weather Conditions: Local weather patterns, including cloud cover and precipitation, should be considered when determining the best angle.
Latitude: The latitude of your location is a crucial factor in determining the best degree angle for solar panels. Generally, the optimal tilt angle is close to the latitude of your installation site, allowing for maximum solar exposure throughout the year.
Seasonal Sun Path: Throughout the year, the sun travels along different paths in the sky. In summer, the sun is higher, necessitating a lower tilt angle for solar panels, while in winter, the sun is lower, requiring a steeper angle to capture more sunlight effectively.
Tilt Angle Adjustments: To maximize solar energy production, adjusting the tilt angle of your solar panels seasonally can be beneficial. For example, setting the panels at an angle equal to your latitude plus 15 degrees in winter and minus 15 degrees in summer can optimize energy capture.
Weather Conditions: Local weather conditions, such as frequent cloud cover or rainy days, can impact solar energy production. Understanding these patterns can help in selecting the best angle to mitigate losses due to less sunlight during certain times of the year.
What is the Recommended Angle for Fixed Solar Panels?
Best practices for determining the optimal angle include conducting a solar site analysis using tools like solar pathfinders or software that can model sunlight exposure at different angles throughout the year. Many solar installers also offer personalized consultations to recommend the best tilt based on specific site conditions. Additionally, keeping abreast of local regulations and incentives can further enhance the benefits of properly angled solar installations.
How Can You Accurately Calculate the Optimal Angle for Your Home?
Seasonal Variations: The sun’s position changes throughout the year, so adjusting your solar panels’ angle seasonally can yield better energy production. For example, tilting panels steeper in winter can capture more sunlight, while a flatter angle in summer can help maximize exposure during longer days.
Roof Pitch: The pitch of your roof can limit how you can position your solar panels. If your roof is already steep, you may need to consider how to balance the panel’s angle while ensuring proper installation and drainage.
Shading and Obstructions: Analyze your property for potential shading from trees or buildings, as these can significantly reduce solar panel performance. Ensuring that your panels are well-angled to avoid obstructions is essential for maximizing sunlight exposure.
Solar Panel Type: Different solar panels have different characteristics that can affect the optimal angle. For instance, some panels are designed to perform better at lower angles, while others may be more efficient at steeper angles, and understanding these differences can help you maximize your system’s output.
What Are the Advantages of Using Adjustable Solar Panel Angles?
The advantages of using adjustable solar panel angles include improved energy efficiency, enhanced performance in varying weather conditions, and increased longevity of the panels.
- Improved Energy Efficiency: Adjusting the angle of solar panels allows them to capture more sunlight, especially during different times of the year. By optimizing the tilt, panels can achieve a better angle relative to the sun, maximizing energy production and increasing overall efficiency.
- Enhanced Performance in Varying Weather Conditions: Different weather conditions and geographical locations can affect solar panel performance. By adjusting the angle, users can mitigate the impact of clouds, rain, or snow, ensuring the panels absorb as much sunlight as possible, regardless of environmental factors.
- Increased Longevity of Panels: Properly angled solar panels can reduce wear and tear caused by debris accumulation and water pooling. By maintaining an optimal position, the panels are less likely to suffer damage, leading to a longer lifespan and lower maintenance costs.
- Flexibility for Seasonal Changes: As seasons change, the position of the sun shifts, which affects how much sunlight solar panels receive. Adjustable angles allow for seasonal adjustments, ensuring that panels remain efficient throughout the year, particularly during winter and summer solstice.
- Maximized Return on Investment: By enhancing energy output through optimal angles, users can achieve quicker payback periods on their solar investments. Higher energy production translates to lower electricity bills and better incentives, making the investment more financially attractive.
How Can Seasonally Adjusting Your Panels Improve Efficiency?
Seasonally adjusting your solar panels can significantly improve their efficiency by optimizing their angle to capture the most sunlight throughout the year.
- Summer Adjustment: In summer, the sun is higher in the sky, so solar panels should be tilted at a lower angle to maximize direct sunlight exposure.
- Winter Adjustment: During winter months, the sun is lower on the horizon, necessitating a steeper tilt to ensure that panels capture as much solar energy as possible.
- Spring and Fall Adjustment: These transitional seasons require intermediate angles; adjusting panels to a middle degree helps maintain efficiency as the sun shifts in the sky.
- Latitude Considerations: The best degree angle for solar panels can vary greatly depending on your geographical location, as different latitudes experience varying sun paths.
- Fixed vs. Adjustable Systems: While fixed solar panel systems have a set angle that may not be optimal year-round, adjustable systems allow for seasonal modifications that enhance energy production.
In summer, panels should be adjusted to a lower angle, around 10 to 15 degrees less than the latitude of the location, to capture sunlight directly overhead and maximize energy production. Conversely, during winter, panels are best tilted at an angle equal to the latitude plus 15 degrees, thereby optimizing sunlight exposure during the shorter days.
During spring and fall, adjusting the panels to a mid-range angle, which is often the latitude itself, can help balance the sun’s position throughout these transitional months. Moreover, understanding latitude is critical, as areas closer to the equator require less tilt variation compared to those at higher latitudes, where the sun’s path varies significantly.
Finally, adjustable systems provide a significant advantage over fixed installations by allowing users to recalibrate the angle of their panels based on seasonal changes, ultimately leading to improved efficiency and higher energy yields over the lifespan of the solar installation.
What Tools and Resources Can Help You Find the Best Angle for Installation?
Several tools and resources can assist in determining the best degree angle for solar panel installation:
- Solar Angle Calculator: This online tool allows users to input their geographical location and date to calculate the optimal angle for solar panels. It considers factors such as the sun’s position throughout the year to maximize energy capture.
- Solar Path Finder: A physical tool that helps visualize the sun’s path over a specific location, allowing for accurate angle adjustments based on surrounding obstructions. It provides a comprehensive view of sun exposure and shadows throughout the day and year.
- GIS Software: Geographic Information System software enables advanced analysis of topography and solar radiation data. It can be used to model different installation angles and their potential energy output based on local geographic features.
- Mobile Apps: Various apps are available that can assist in determining the best angle for solar panel installation by using augmented reality or GPS data. These apps simplify the process by providing real-time sun path information and angle recommendations.
- Local Solar Installers: Consulting with professional solar installers can provide invaluable insights into the best angle for solar panel installation based on local conditions, regulations, and historical performance data. Their experience can guide choices that maximize efficiency.
The Solar Angle Calculator is particularly useful for individuals who want a quick estimation based on their specific location and the time of year, ensuring panels are positioned for optimal sunlight absorption. The Solar Path Finder, on the other hand, offers a more hands-on approach, enabling users to visually assess how nearby structures might impact sun exposure throughout the seasons.
GIS Software is ideal for those needing in-depth analysis, as it takes into account complex terrain and can simulate various angles to forecast energy production. Mobile apps add convenience by delivering essential data on the go, making it easier to assess different installation scenarios without needing extensive equipment.
Lastly, local solar installers can provide tailored advice and insights that consider unique local conditions, helping to ensure that the chosen angle will yield the best performance based on real-world experience.
What Common Mistakes Do Homeowners Make When Setting Solar Panel Angles?
Not Consulting Experts: Homeowners often rely on online resources for angle calculations instead of seeking professional advice. This lack of consultation can result in improper angle settings that fail to account for specific local conditions or the unique characteristics of the installation site.
Related Post: