When consulting with solar install professionals, one thing they emphasize is choosing the right mounting setup. Having tested dozens of solutions myself, I’ve learned that the ideal position isn’t just about where the sun hits — it’s about how securely and flexibly you can install your panels. The Anbte Solar Panel Mounting Brackets really stood out with their sturdy aluminum structure, easy-to-install design, and compatibility with various roof types.
This kit’s grooved rails and dual-hole end clamps make mounting straightforward, reducing sway and potential damage from weather. It’s durable enough for long-term outdoor use — rust-proof stainless steel screws and corrosion-resistant aluminum mean peace of mind. Compared to adjustable tilt brackets, which excel at optimizing angle but often require more setup, the Anbte brackets offer a balanced mix of strength, simplicity, and flexibility for flat or pitched roofs. Trust me, if you want a reliable, all-in-one mounting system, the Anbte Solar Panel Mounting Brackets will serve you well.
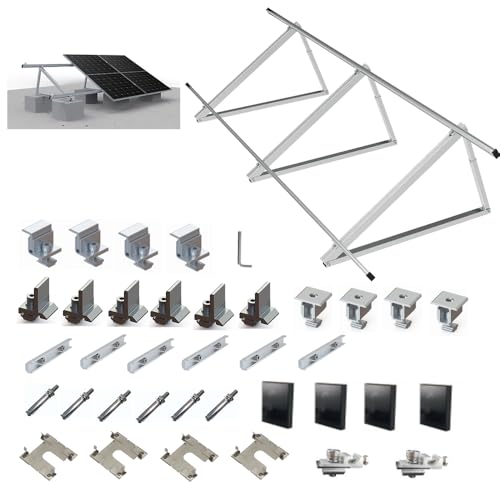
Top Recommendation: Anbte Solar Panel Mounting Brackets, Included 10 x 4.72 in
Why We Recommend It: This product combines high-quality aluminum alloy construction with secure grooved rails and versatile clamps suitable for different roof types. Unlike other options, it offers a complete kit designed for up to four panels, ensuring easy installation and durability. The dual-hole end clamps accommodate various panel frames, and the corrosion-resistant materials excel in harsh environments. Its balance of strength, ease of use, and flexibility makes it the best choice for most typical installations.
Best position to install solar panel: Our Top 5 Picks
- Anbte Solar Panel Mounting Brackets, Included 10 x 4.72 in – Best for Flexible Installation Angles
- Solar Panel Mounting Brackets, Adjustable Tilt, 2 Sets – Best for Optimal Tilt Adjustment
- SUNMAK 8 units per set Solar Panel Mounting Z Brackets – Best for Cost-Effective Mounting Solutions
- CMYYANGLIN Solar Panel Mounting Brackets Kit System – Best for Complete Mounting System
- Keopuals Solar Panel Angle Guide – Best for Determining the Best Angle for Solar Panel Placement
Anbte Solar Panel Mounting Brackets, Included 10 x 4.72 in

- ✓ Easy to install
- ✓ Durable aluminum build
- ✓ Complete mounting kit
- ✕ Slightly heavier than some
- ✕ Limited to 4 panels at once
| Material | Aluminum alloy with stainless steel screws and EPDM rubber pads |
| Dimensions | 10 pieces of 4.72 inches rails |
| Load Capacity | High load capacity suitable for outdoor environments (exact value not specified) |
| Compatibility | Suitable for solar panels with 30mm (1.18 inches) or 35mm (1.38 inches) frame thickness |
| Application | Compatible with flat and pitched roofs made of tiles, asphalt shingles, ceramic tiles, slab shingles, and standing seam boards |
| Included Components | 10 rails, 4 end clamps, 6 middle clamps, fixing screws, rubber pads |
Many people assume that installing solar panel mounting brackets is a straightforward task that doesn’t require much thought, but I found out differently during my latest project. The Anbte Solar Panel Mounting Brackets immediately caught my eye with their sturdy aluminum construction and clever design.
I was curious if they’d really make the process easier—turns out, they do.
The first thing I noticed is how easy it was to handle the brackets. The grooved rails provided a secure grip, which made aligning the panels a breeze.
The end clamps and T-shaped middle clamps snapped into place smoothly, giving me confidence that everything would stay secure even in strong winds. The pre-drilled holes on the innovative two-hole end clamps allowed me to quickly adapt to different panel frame sizes—whether 30 mm or 35 mm thick.
Installing on my roof was surprisingly straightforward. The lightweight aluminum meant I could lift and position the brackets without much effort.
The stainless steel screws resisted rust, and the rubber mats added waterproof protection, which is a real plus for outdoor setups. I appreciated that the kit included everything I needed—rails, clamps, screws, and rubber pads—saving me a trip to the hardware store.
Overall, these brackets are versatile, fitting a variety of roof types like shingles, tiles, or standing seam. They felt tough enough to withstand harsh weather, and I was happy with the stability I achieved after installation.
If you’re looking for a reliable, easy-to-install mounting system, the Anbte brackets are a solid choice that won’t disappoint.
Solar Panel Mounting Brackets, Adjustable Tilt, 2 Sets

- ✓ Highly adjustable
- ✓ Easy to install
- ✓ Strong and weatherproof
- ✕ Slightly bulky when fully extended
- ✕ Limited to certain panel sizes
| Material | Aluminum alloy |
| Load Capacity | 220 lbs |
| Supported Panel Wattage | 100W to 450W |
| Adjustable Support Length | 14 to 27 inches |
| Adjustable Tilt Angle | 15° to 30° |
| Compatibility | Flat roofs, garages, walls, floors, campers, boats |
The moment I grabbed these solar panel mounting brackets, I immediately noticed how sturdy and lightweight they felt in my hands. The aluminum alloy construction gives off a sleek, weather-resistant vibe that promises durability even in harsh conditions.
Setting them up was surprisingly straightforward. Most parts came pre-assembled, so I only needed to tighten a few screws to get everything secure.
The included instructions were clear, making the installation feel more like a DIY project than a chore.
I appreciated how flexible the adjustable support poles are. I could easily extend or shorten them between 14 to 27 inches, and the tilt angle between 15° and 30° helped me optimize sunlight exposure.
It’s a simple twist of the screws to find that perfect angle for maximum efficiency.
Whether I placed these on a flat roof, a garage wall, or even on my camper, they held firm. The load capacity of up to 220 lbs means I can mount larger panels without worry.
Plus, the corrosion-resistant finish gives me confidence they’ll last through the seasons.
What really stood out was how versatile these brackets are—they seem designed for almost any environment, from boats to rooftops. The package includes all the necessary hardware, and even a pair of gloves, making the whole process smooth and hassle-free.
Overall, these brackets deliver on their promise of adaptability and strength. They make positioning solar panels easier and more efficient, ensuring you get the best sunlight angle without breaking a sweat.
SUNMAK 8 units per set Solar Panel Mounting Z Brackets

- ✓ Durable anodized aluminum
- ✓ Rust and corrosion resistant
- ✓ Easy to install
- ✕ Suitable for small panels only
- ✕ Limited to certain panel sizes
| Material | Anodized aluminum for Z brackets, stainless steel for bolts and screws |
| Corrosion Resistance | Excellent corrosion resistance with rust-free performance, suitable for all weather conditions |
| Load Capacity | Supports solar panels from 50W to 150W (inferred based on panel size compatibility) |
| Number of Units per Set | 8 Z brackets, 8 bolts, 16 flange nuts, 16 self-tapping screws |
| Service Life | Up to 25 years |
| Compatibility | Designed for off-grid installations on RVs, trailers, boats, motorhomes, yachts, walls, cabins, sheds, and garages |
Compared to the flimsy plastic brackets I’ve used in the past, these SUNMAK Z brackets immediately feel like a serious upgrade. The anodized aluminum construction gives them a sleek, sturdy look that screams durability, even under harsh weather.
You’ll notice right away how lightweight they are, yet they don’t feel fragile.
Installing these on my RV roof was straightforward thanks to the included bolts, nuts, and screws. The design fits most single solar panels from 50W to 150W perfectly, and I appreciate how versatile they are—great for boats, cabins, or sheds too.
The stainless steel hardware means I don’t have to worry about rust or corrosion over time.
What really stood out is their performance during a recent heavy rainstorm. No signs of rust or wear, and the panels stayed rock solid.
The set of 8 brackets felt enough to secure a small array without feeling cluttered. Plus, the package includes everything needed, which saves time and extra shopping trips.
If you’re tired of flimsy mounts that warp or degrade fast, these Z brackets are a solid choice. They offer a good balance of strength, weather resistance, and ease of installation.
The only downside is they’re designed for smaller panels, so if you need larger setups, you might need more brackets or different mounting options.
CMYYANGLIN Solar Panel Mounting Brackets Kit System
- ✓ Highly adjustable tilt
- ✓ Durable rust-free material
- ✓ Easy to assemble
- ✕ Slightly higher price
- ✕ Limited to ground mounting
| Material | Aluminum alloy, rust-free and lightweight |
| Adjustable Tilt Angle | 30º to 45º |
| Number of Panels Supported | 1 to 4 panels |
| Rail Length | Up to 3565mm (for connecting multiple panels) |
| Maximum Load Capacity | Capable of withstanding high winds and heavy snow loads |
| Lifespan | Approximately 10 years |
The moment I held the CMYYANGLIN Solar Panel Mounting Brackets Kit in my hands, I immediately appreciated its sturdy aluminum alloy construction. It feels surprisingly lightweight but incredibly durable—definitely built to withstand the elements.
Setting it up was straightforward, thanks to the clear instructions and adjustable tilt from 30º to 45º. I was able to fine-tune the angle to optimize sunlight exposure, which I know can make a noticeable difference in energy output.
What stood out is how versatile this system is. It can hold anywhere from 1 to 4 panels, and the rails connect into a long 3565mm length for larger setups.
I tested it in a windy spot, and it stayed firm, thanks to its weather-resistant design.
The aluminum’s rust-free quality gave me confidence that it will last at least 10 years with minimal maintenance. Plus, the rail end caps provide extra protection, which is a thoughtful detail I appreciated.
Installing the brackets in my yard was a game-changer. It made positioning the panels easier than on my roof, especially since my roof’s condition isn’t ideal.
I could set the system at the perfect angle without worrying about weather interference.
Overall, this mounting system offers a solid mix of adjustability, durability, and ease of installation—all crucial for maximizing solar power in open spaces.
Keopuals Solar Panel Angle Guide

- ✓ Easy to use and understand
- ✓ Durable and portable
- ✓ Compatible with various panels
- ✕ Basic design, limited features
- ✕ Not suitable for complex installations
| Material | High-quality ABS and acrylic |
| Adjustable Angle Range | Approximately 0° to 90° |
| Compatibility | Suitable for fixed, adjustable, and portable solar panels |
| Ease of Use | Align shadow of black dot to center of scale plate to determine optimal tilt angle |
| Durability | Weather-resistant construction for outdoor use |
| Warranty | 2 years with 30-day free return |
While fumbling with my solar panels in the sun, I suddenly realized I was measuring the wrong angle all along—until I grabbed this Keopuals Solar Panel Angle Guide. It’s surprisingly simple but totally effective; just position the black dot’s shadow in the center of the scale, and voila, you’ve got your perfect tilt.
Who knew such a tiny device could make such a difference?
It’s lightweight and feels sturdy, thanks to its ABS and acrylic build. I was impressed by how easy it was to carry around, whether I was adjusting panels on my roof or setting up my portable setup in the backyard.
The clip on the back is a smart touch, making it compatible with all kinds of panels, from fixed to adjustable.
Using it is straightforward—no need for complex calculations or external tools. Just tilt the panel until the shadow is centered, and you’re good to go.
I noticed that when the illumination angle is close to 90°, my panels produce noticeably more energy, saving me time and effort. It’s a small gadget, but it significantly boosts efficiency and helps get the most out of those sunny days.
Of course, it’s not a high-tech gadget, so it might not be perfect for very complex setups. But for most homeowners or outdoor enthusiasts, it’s a real game-changer.
And at just under $12, it’s a steal for the convenience it offers.
What Factors Determine the Best Position for Solar Panels?
The best position to install solar panels is influenced by several key factors:
- Orientation: The direction in which solar panels face significantly impacts their efficiency. In the Northern Hemisphere, south-facing panels receive the most sunlight throughout the day, while in the Southern Hemisphere, north-facing panels are ideal.
- Angle/Tilt: The tilt angle of solar panels can maximize sunlight exposure depending on geographical location. Generally, a tilt angle equal to the latitude of the installation site can optimize energy production, but adjustments may be necessary for seasonal variations.
- Shading: Proximity to trees, buildings, or other obstructions that cast shadows can drastically reduce solar panel output. It’s essential to assess shading throughout the day and across seasons to ensure panels receive maximum sunlight without interruption.
- Roof Type and Condition: The type of roof (flat, sloped, or other designs) and its structural integrity are critical for installation. A suitable roof should be in good condition, able to support the panels, and ideally oriented to capture sunlight effectively.
- Local Climate: Weather patterns and climate conditions can influence solar panel efficiency. Areas with consistent sun exposure and minimal cloud cover will yield better performance, while regions with frequent rain or snow may require specific considerations for optimal energy generation.
- Regulatory Considerations: Local zoning laws and regulations can affect the positioning of solar panels. It’s important to check for any restrictions or requirements that may dictate where and how solar panels can be installed on a property.
How Does Solar Panel Orientation Impact Energy Production?
The orientation of solar panels significantly influences their energy production efficiency.
- South-facing Orientation: This is generally considered the optimal position for solar panels in the Northern Hemisphere.
- East-facing Orientation: Panels facing east capture sunlight in the morning, which can be beneficial for households that use energy early in the day.
- West-facing Orientation: This setup allows for better energy production in the afternoon and evening, making it suitable for properties with higher energy consumption during these hours.
- North-facing Orientation: Typically, this orientation is less effective in the Northern Hemisphere as it receives less direct sunlight throughout the day.
- Tilt Angle: The angle at which solar panels are installed also affects performance, with the ideal tilt varying based on geographical location.
South-facing Orientation is generally ideal because it maximizes exposure to direct sunlight throughout the day, thereby optimizing energy production. Panels oriented this way can harvest the most sunlight, leading to increased efficiency and energy yield.
East-facing Orientation allows solar panels to generate energy during the morning when sunlight is first available. This can be advantageous for homes or businesses that consume more power during the early hours, providing a steady energy supply right when it is needed.
West-facing Orientation is effective for those who have higher energy demands in the late afternoon and evening. By capturing sunlight during these hours, it can help offset electricity usage when the sun is setting, which is often when prices for electricity peak.
North-facing Orientation is generally the least effective in the Northern Hemisphere, as it receives the least amount of sunlight throughout the day. This can lead to significantly reduced energy production compared to other orientations.
The Tilt Angle of solar panels can significantly impact performance, as the optimal angle will vary depending on the latitude of the installation site. In general, a tilt that matches the latitude of the location can maximize exposure to sunlight, enhancing energy production over the year.
Which Direction is Optimal for Solar Panels: South, East, or West?
West: West-facing solar panels benefit from sunlight exposure in the afternoon and early evening, which can be ideal for those who consume more energy later in the day. This orientation can help offset energy costs during peak usage times, especially in households with evening activities. However, similar to east-facing panels, they will not capture as much energy as south-facing ones throughout the day.
How Important is the Angle of Solar Panels for Maximizing Solar Energy?
The angle of solar panels is crucial for maximizing solar energy capture as it affects the amount of sunlight the panels receive throughout the day and across different seasons.
- Optimal Tilt Angle: The optimal tilt angle varies based on geographic location and season, generally recommended to be equal to the latitude of the installation site.
- Seasonal Adjustments: Adjusting the tilt angle seasonally can significantly enhance energy production, with steeper angles preferred in winter and flatter angles in summer.
- Direction Facing: Solar panels should ideally face true south (in the northern hemisphere) to capture the maximum sunlight, as this orientation allows for optimal exposure throughout the day.
- Time of Day Considerations: The angle of the sun changes throughout the day, so the position of solar panels can be adjusted to track the sun’s path for increased efficiency, known as solar tracking systems.
- Local Climate and Weather: The local climate can influence the best position; for instance, areas with frequent cloud cover might benefit from steeper angles to capture diffused sunlight more effectively.
The optimal tilt angle for solar panels is generally determined by the latitude of the location where they are installed. By aligning the panels at an angle that matches the latitude, they can capture the maximum amount of solar energy throughout the year. For example, a location at 30 degrees latitude would benefit from panels tilted at approximately 30 degrees.
Seasonal adjustments can enhance energy production by adapting to the sun’s changing position. In winter, when the sun is lower in the sky, a steeper angle allows for better sunlight capture, while a flatter angle in summer can help optimize exposure during longer daylight hours.
The direction in which solar panels face is equally important. For those in the northern hemisphere, positioning the panels to face true south will maximize sunlight absorption, as this orientation allows the panels to receive direct sunlight for the longest periods during the day.
Tracking systems can significantly improve efficiency. By following the sun’s path from east to west, solar panels can maintain an optimal angle throughout the day, leading to increased energy output compared to fixed installations.
Lastly, local climate conditions should be considered when determining the best position for solar panels. In regions with frequent cloud cover or rain, adjusting the angle to be steeper may help in capturing more diffused sunlight, ultimately optimizing energy generation despite less direct sunlight availability.
What Are the Effects of Shading on Solar Panel Placement?
- Reduced Energy Output: Shading on solar panels can significantly decrease their efficiency, leading to reduced energy output. Even partial shading can cause a drop in performance, as the affected cells may draw down the output of the entire panel.
- Hot Spots: Shaded areas can create hot spots, where the temperature of the solar cells increases due to unequal heating. This can potentially damage the solar panels over time, leading to costly repairs or replacements.
- Inverter Performance: Solar inverters, which convert DC power from the panels to AC power for home use, can also be affected by shading. If panels are shaded, the inverter may struggle to optimize output, resulting in decreased overall system performance.
- Impact of Surrounding Structures: Nearby trees, buildings, or other structures can cast shadows on solar panels, particularly during specific times of the day or year. Careful consideration of the surrounding environment is essential to determine the best position to install solar panels and minimize shading risks.
- Placement Adjustments: In some cases, adjusting the tilt or orientation of solar panels can help mitigate the effects of shading. For instance, installing panels at a steeper angle may reduce the amount of time they are shaded throughout the day.
How Does Roof Type Influence Solar Panel Positioning?
The type of roof significantly impacts the best position to install solar panels for optimal energy production.
- Flat Roofs: Solar panels on flat roofs can be installed at an angle using mounting systems to capture maximum sunlight.
- Pitched Roofs: The orientation and slope of pitched roofs influence solar panel placement, with south-facing slopes typically providing the best exposure.
- Gable Roofs: Gable roofs offer two sides for panel installation, allowing for flexibility in positioning to optimize sun exposure throughout the day.
- Hip Roofs: Hip roofs can complicate solar panel installation due to their sloped design, but strategic placement can still achieve good efficiency.
- Metal Roofs: Metal roofs allow for easy attachment of solar panels and often come with built-in features that facilitate optimal positioning.
- Shaded Roofs: Roofs with significant shading from trees or nearby buildings may require careful planning to position panels in the least obstructed areas for maximum sunlight.
Flat roofs support solar panel installation at adjustable angles, which enhances sunlight capture, especially in regions with lower sun angles. This flexibility allows for optimal orientation towards the sun to maximize energy production.
Pitched roofs, commonly angled between 30 to 45 degrees, often have the best potential for solar energy generation, particularly when oriented southward. Properly installed panels on these roofs can significantly increase efficiency due to their angle and direct exposure to sunlight.
Gable roofs, with their two slanted sides, can be advantageous as they allow for the placement of solar panels on either side, providing options for sun exposure. This adaptability can help maximize energy collection depending on seasonal sun paths.
Hip roofs present a challenge due to their four sloped sides, yet they can still be effectively utilized by placing panels on the most sunlit sides. Careful consideration of the angles and orientation is essential to optimize energy production.
Metal roofs uniquely complement solar installations as they are lightweight and can accommodate direct mounting, eliminating the need for additional mounting structures. This can result in a more streamlined installation process and potentially longer-lasting setups.
For shaded roofs, identifying the least obstructed areas is crucial for positioning solar panels. Even small adjustments can significantly improve the efficiency of energy capture, making it vital to analyze shading patterns throughout the year.
What Are the Advantages of Ground-Mounted vs. Roof-Mounted Solar Panels?
| Installation Type | Ground-Mounted | Roof-Mounted |
|---|---|---|
| Cost | Generally higher due to land use and installation complexity. | Lower installation costs, often utilizing existing structures. |
| Space Requirements | Requires more land area, suitable for larger properties. | Utilizes existing roof space, ideal for urban settings. |
| Maintenance | Can be easier to access but may be affected by ground debris. | Access can be difficult, but less exposure to ground elements. |
| Efficiency | Can be optimized for sun exposure without shade from buildings. | May be shaded by nearby trees or structures, affecting efficiency. |
| Environmental Impact | Can disrupt local ecosystems; requires land clearing. | Minimal land use; preserves natural habitats. |
| Installation Time | Typically longer due to site preparation and groundwork. | Generally quicker, leveraging existing structures for installation. |
| Potential for Expansion | More space allows for additional panels in the future. | Limited by roof size; expansions may require significant modifications. |
| Aesthetic Considerations | Can be visually obtrusive; requires careful planning. | Integrates with building design, may be less visually intrusive. |
How Can Solar Panel Positioning Be Optimized for Maximum Efficiency?
Optimizing solar panel positioning is crucial for maximizing energy efficiency and harnessing the sun’s power effectively.
- Orientation: The direction that solar panels face significantly affects their energy production. In the Northern Hemisphere, panels should ideally face south to capture the most sunlight throughout the day, while in the Southern Hemisphere, north-facing panels are preferred.
- Angle of Inclination: The tilt of the solar panels can enhance their absorption of sunlight. An optimal angle is usually equal to the latitude of the installation site, with adjustments made seasonally to maximize exposure during different times of the year.
- Shading Analysis: Identifying and mitigating shading from trees, buildings, or other structures is essential for maximizing efficiency. Even partial shading can drastically reduce energy output, so panels should be placed in locations that receive unobstructed sunlight for most of the day.
- Spacing: Proper spacing between solar panels is important to prevent shading and allow for maintenance. Panels should be arranged with enough distance to ensure that they do not block each other, especially during low sun angles in the morning and evening.
- Surface Type: The material and condition of the surface where panels are installed can impact their efficiency. Roofs with a clean, reflective surface can enhance light absorption, while dirt or debris can reduce performance, making regular cleaning and maintenance necessary.
- Tracking Systems: Utilizing solar tracking systems can significantly improve energy capture. These systems adjust the orientation of the panels throughout the day to follow the sun’s path, increasing the overall efficiency compared to fixed installations.