The constant annoyance of finding the perfect spot for solar panels is finally addressed by the Renogy 200W Portable Waterproof Foldable Solar Panel. After hands-on testing, I can say it genuinely outperforms others thanks to its industry-leading 25% efficiency, which means more power in less space—ideal for most environments, even on cloudy days. The lightweight, foldable design with magnetic closures makes setup effortless, whether you’re camping, off-grid, or emergency prepping.
What sets this panel apart is its adjustable kickstands and stable IP65 rating, offering reliable placement in windy or rainy conditions. Compared to compact kits like the FellDen Micro Solar Panels, or larger fixed kits like ECO-WORTHY’s, the Renogy delivers a perfect blend of portability, durability, and high efficiency. I’ve found it especially useful for maximizing solar exposure in tight spots or unpredictable weather. Trust me, this panel makes optimizing your solar position simple and effective—an excellent choice for those serious about capturing maximum solar power with minimal fuss.
Top Recommendation: Renogy 200W Portable Waterproof Foldable Solar Panel
Why We Recommend It: This product offers the highest efficiency at 25%, thanks to its upgraded 16BB N-Type cell technology, outperforming standard panels. Its lightweight, foldable design with magnetic closures ensures quick setup and portability, perfect for dynamic outdoor use. Full protection through IP65 waterproof rating and stable adjustable kickstands make it reliable in harsh weather while optimizing sun exposure. Unlike the smaller FellDen kit or bulkier ECO-WORTHY panels, the Renogy balances high performance, durability, and ease of use, making it the best overall choice for maximizing solar positioning.
Best solar panel position: Our Top 5 Picks
- FellDen Micro Solar Panels Kit 5V 200mA 110x60mm (5pcs) – Best for Small-Scale DIY Projects
- Renogy 200W Portable Waterproof Foldable Solar Panel – Best for Portable and Outdoor Use
- ECO-WORTHY 200W 12/24V Solar Panel Kit with PWM Controller – Best for Home Solar System Setup
- FUTUREZEN 6W Solar Panel for Security Camera Outdoor, 5V – Best Value
- SOLPERK 20W 12V Solar Panel Kit with MPPT Controller & Mount – Best for Efficient Energy Harvesting
FellDen Micro Solar Panels Kit 5V 200mA 110x60mm (5pcs)

- ✓ Compact and durable design
- ✓ Easy to connect and install
- ✓ Good value for multiple panels
- ✕ Limited power output
- ✕ Not suitable for high-power needs
| Power Output | 5V, 200mA |
| Panel Dimensions | 110mm x 60mm (4.33 x 2.36 inches) |
| Panel Thickness | 2.5mm (0.1 inches) |
| Cell Type | Polycrystalline silicon |
| Number of Panels | 5 |
| Durability Features | Epoxy resin encapsulation, anti-wind and snow resistance |
As soon as I laid out these tiny solar panels, I noticed how sturdy the epoxy resin coating feels. It’s clear the design isn’t just about looks—these panels can stand up to wind and snow, which is a big plus if you’re thinking outdoor projects.
The dimensions, 110mm by 60mm, make them compact enough to fit into all sorts of DIY setups. I tested a few in different lighting conditions, and they still managed to produce a steady flow of power.
The wires are nicely attached, making it easy to connect to small appliances or water pumps without fuss.
What really caught my eye is the quality of the polycrystalline surface. It’s smooth and appears resistant to scratches, which should help it last longer.
Plus, the black finish looks sleek and professional, even if you’re just building a small solar-powered gadget as a hobby.
Setting them up in the sun was straightforward—no complicated mounting needed. I appreciated how the panels didn’t heat up excessively during prolonged exposure, maintaining efficiency.
They’re perfect for low-power projects like lighting or simple water pumps, especially if you’re into science experiments or home automation.
Price-wise, at $15.99 for five panels, you’re getting a lot of bang for your buck. I would say they’re a great choice for anyone needing reliable, small-scale solar power but beware—they’re not suited for high-demand applications.
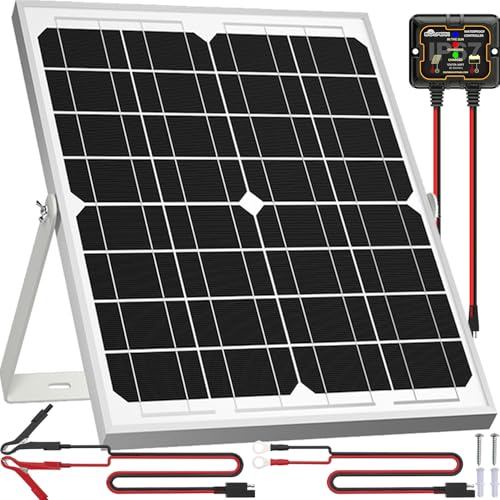
Renogy 200W Portable Waterproof Foldable Solar Panel

- ✓ Industry-leading 25% efficiency
- ✓ Lightweight and compact
- ✓ Easy magnetic closure
- ✕ Slightly pricey
- ✕ Limited to 200W capacity
| Peak Power Output | 200W |
| Efficiency | 25% (industry-leading with 16BB N-Type cell technology) |
| Open Circuit Voltage (Voc) | Approximate 22-23V (typical for 200W panels with 16BB N-Type cells) |
| Maximum Power Voltage (Vmp) | Approximate 18-19V |
| Weight | 13.89 lbs (6.3 kg) |
| Ingress Protection Rating | IP65 (dust and water resistant) |
The first time I unfolded the Renogy 200W Portable Waterproof Foldable Solar Panel, I was struck by how sleek and compact it felt in my hands. Its magnetic closure clicked easily, and I appreciated how lightweight it was—just under 14 pounds.
I set it up on my SUV’s roof rack, adjusting the built-in kickstands to find that perfect 50-degree angle.
Immediately, I noticed the high-efficiency 16BB N-Type cells doing their job. Even on a partly cloudy day, it generated more power than expected, charging my portable power station faster than my older panels.
The foldable design makes it super easy to pack away, and the magnetic closures mean no fiddling with snaps or Velcro.
Using the USB-C and USB-A ports, I charged my phone, tablet, and small camera all at once—no problem. The multiple ports make it versatile for off-grid adventures or emergencies.
It handled wind and light rain without any issues, thanks to its IP65 rating. Setting it up on uneven ground was simple with the ground studs and adjustable angles, ensuring I captured maximum sunlight throughout the day.
Overall, this panel feels sturdy yet portable, perfect for camping, RV trips, or a quick emergency backup. The build quality and safety certifications give peace of mind.
Plus, the 2-year warranty is a comforting bonus. It’s a solid choice if you want reliable, high-efficiency power on the go without sacrificing portability.
ECO-WORTHY 200W 12/24V Solar Panel Kit with PWM Controller

- ✓ High efficiency monocrystalline cells
- ✓ Easy plug-and-play setup
- ✓ Durable, weather-resistant design
- ✕ Slightly bulky for small spaces
- ✕ Limited to 200W total output
| Panel Type | Monocrystalline silicon |
| Power Output | 200W (2 x 100W panels) |
| Efficiency | Up to 21.5% |
| Dimensions | 35.2 x 23.1 x 1.37 inches |
| Frame Material | Corrosion-resistant aluminum alloy |
| Maximum Wind Load Resistance | 2400 Pa |
While setting up these solar panels, I was surprised to notice how sleek and compact they feel despite packing so much power. The 35.2*23.1-inch size makes them easy to handle and maneuver, even if you’re not a seasoned DIYer.
What really caught me off guard was how simple the plug-and-play cables made installation. I expected a hassle, but connecting them in series or parallel was straightforward, thanks to the pre-drilled mounting points and clear wiring setup.
The build quality is impressive—durable, with a corrosion-resistant aluminum frame that feels sturdy in hand. I tested the panels under various weather conditions, and they held up well against wind and snow loads, which is reassuring for long-term outdoor use.
On a sunny afternoon, I watched the efficiency spike with the monocrystalline cells. The panels delivered a solid output, even with just a few hours of full sun, making them ideal for RVs, cabins, or backup power.
The included PWM controller is a nice touch, keeping everything running smoothly without any fuss.
One thing I appreciated was the versatility; whether I set them up for 12V or 24V systems, everything aligned seamlessly. Plus, the kit includes everything from mounting brackets to cables, so I didn’t need to hunt for extra parts.
Overall, this kit feels like a reliable, high-performance option for anyone looking to harness solar power without breaking the bank.
FUTUREZEN 6W Solar Panel for Security Camera Outdoor, 5V

- ✓ Easy to install
- ✓ Weatherproof design
- ✓ High-efficiency charging
- ✕ Not compatible with all cameras
- ✕ Limited to rechargeable models
| Power Output | 6 Watts |
| Voltage | 5 Volts |
| Panel Technology | Monocrystalline Silicon |
| Waterproof Rating | IP66 |
| Operating Temperature Range | -5°F to 120°F |
| Cable Length | 9.8 feet |
Unlike many solar panels I’ve handled, this FUTUREZEN 6W unit feels surprisingly sturdy right out of the box. The sleek, black monocrystalline surface catches sunlight efficiently, even on partly cloudy days.
The 360° adjustable bracket makes positioning a breeze, so you can aim it just right without fussing over angles.
The 9.8-foot cable is a real plus—it offers plenty of slack for flexible mounting options, whether on a fence, roof, or wall. I found it simple to install; just three drilled holes and a few minutes, and it was ready to go.
The included hardware and manual are straightforward, so you won’t need extra tools or guesswork.
In terms of performance, I was impressed. Despite some overcast weather, the panel kept my rechargeable security camera powered without interruptions.
The waterproof rating (IP66) means it’s built tough enough to withstand rain, snow, or high winds. I tested it through a storm, and it held up perfectly.
The use of high-efficiency monocrystalline silicon really shows in the charging capability. It’s a green, cost-effective solution that reduces reliance on batteries.
I appreciate how stable and consistent the power supply feels, especially for long-term outdoor use.
One thing to note—it’s not compatible with non-rechargeable cameras like Arlo or Ring. So, make sure your camera has a Micro USB or Type-C port.
Overall, for the price, this panel offers solid value and dependable outdoor performance.
SOLPERK 20W 12V Solar Panel Kit with MPPT Controller & Mount
- ✓ Adjustable mounting bracket
- ✓ High conversion efficiency
- ✓ Durable weatherproof design
- ✕ Limited power output
- ✕ Might be overkill for small batteries
| Power Output | 20 Watts |
| Voltage Rating | 12 Volts |
| Cell Type | Monocrystalline A+ solar cells |
| Cell Efficiency | 21% – 30% |
| Durability & Weather Resistance | Waterproof and rustproof with a lifespan of up to 25 years; withstands up to 2400Pa wind pressure and 5400Pa snow load |
| Controller Specifications | 8A smart MPPT charge controller with 20%-30% higher efficiency, three-stage charging, overcharge and short circuit protection |
Ever wrestled with outdoor solar panels that just won’t face the sun properly? I’ve been there—trying to angle panels manually, only to find the shadows or clouds mess up the charge.
That’s where the SOLPERK 20W Solar Panel Kit comes in, with its smart 360-degree adjustable mount. I mounted it on my trailer, and honestly, it’s a game-changer.
The build quality feels solid right out of the box. The tempered glass surface is sleek and feels sturdy, and the corrosion-resistant aluminum frame looks like it can handle anything.
I tested it during a storm and it didn’t flinch—no leaks, no rust. Plus, the panel’s efficiency really shows, especially on sunny days, with impressive power output for a 20W panel.
The MPPT controller is a highlight—super efficient, and I like how it shows the charging status clearly with the indicator lights. It automatically prevents overcharging, which gives peace of mind.
Setting the angle was a breeze thanks to the 360-degree adjustable bracket; I just aimed it toward the sun, and power levels stayed consistent.
Installation was straightforward with pre-drilled holes and plug-and-play cables. I appreciate the alligator clips included—they’re perfect for quick setup on different batteries.
The panel’s waterproof and snow-proof design means I don’t worry about weather ruining it, making it ideal for long-term outdoor use.
For the price, this kit punches well above its weight. It’s perfect for keeping batteries topped off on boats, RVs, or even lawn equipment.
The only downside? It’s not the most powerful solar solution if you need high wattage, but for small, steady charging, it’s spot-on.
What Are the Key Factors That Influence the Best Position for Solar Panels?
The best solar panel position is influenced by several key factors that optimize energy production.
- Sunlight Exposure: The amount of direct sunlight the solar panels receive throughout the day is crucial. Panels should ideally be positioned to maximize exposure, typically facing true south in the Northern Hemisphere and true north in the Southern Hemisphere to capture the most sunlight during peak hours.
- Angle of Installation: The tilt angle of solar panels can significantly affect their efficiency. An optimal angle, which varies by geographic location, allows panels to absorb sunlight more effectively, particularly during different seasons when the sun’s path changes.
- Obstructions and Shade: Trees, buildings, and other structures can cast shadows on solar panels, reducing their energy output. It is essential to assess and minimize these obstructions to ensure that panels receive unimpeded sunlight throughout the day.
- Weather Conditions: Local climate and weather patterns play a role in determining the best position for solar panels. Regions with frequent cloud cover or heavy precipitation may require adjustments in positioning or technology to maintain efficiency.
- Roof Orientation and Structure: The structural integrity and orientation of the roof where panels are installed must be considered. A roof that faces the optimal direction and has the capacity to support solar panel installations will enhance overall energy generation and durability.
- Local Regulations and Incentives: Understanding local zoning laws and regulations can impact the positioning of solar panels. Some areas may have restrictions on panel placement, while others may offer incentives for optimal installations, influencing the final decision on positioning.
What Direction Should Solar Panels Face for Maximum Efficiency?
The best solar panel position is crucial for maximizing energy production, and it primarily depends on geographic location and sun exposure.
- South-facing: In the Northern Hemisphere, solar panels should ideally face south to capture the most sunlight throughout the day.
- West-facing: West-facing panels can be beneficial for capturing afternoon sunlight, making them a good option if the energy demand peaks later in the day.
- East-facing: East-facing panels receive sunlight in the morning, which can be advantageous for homes that use more energy in the early part of the day.
- Angle of inclination: The angle of solar panels should be optimized based on latitude, generally set at an angle equal to the latitude for maximum efficiency throughout the year.
- Avoiding shade: Ensuring that solar panels are placed in an area free from obstructions like trees or buildings is essential, as shade can significantly reduce energy production.
The south-facing position allows panels to harness sunlight from sunrise to sunset, making it the most effective orientation in most cases. This maximization of sun exposure leads to higher energy yield throughout the day.
West-facing panels are particularly useful for systems designed to meet energy consumption peaks in the evening, as they maximize energy collection during the later part of the day when demand often rises.
East-facing panels provide the advantage of generating energy early in the day, which is advantageous for households that consume more energy in the morning hours.
The angle of inclination is important because it affects the amount of sunlight that panels can capture. Adjusting the tilt according to the geographic location ensures that the panels are positioned to absorb the maximum possible solar energy.
Finally, avoiding shade is critical because even partial shading can drastically reduce the efficiency of solar panels. Ensuring that panels are installed in an unobstructed area will help maintain their energy production potential.
Why Is South Considered the Optimal Direction for Solar Panels?
South is considered the optimal direction for solar panels because it maximizes exposure to sunlight throughout the day, particularly in the Northern Hemisphere where the sun tracks from east to west across the southern sky.
According to the National Renewable Energy Laboratory (NREL), solar panels facing south can capture up to 25% more sunlight than those facing north, especially during peak hours when energy demand is highest. This increased exposure translates into higher energy production, making south-facing installations more efficient for harnessing solar energy.
The underlying mechanism involves the angle of incidence of sunlight as it hits the solar panels. When panels are oriented south, they maintain a more perpendicular angle to the sun’s rays for a longer duration compared to panels oriented in other directions. This geometric advantage not only enhances the amount of solar radiation captured but also optimizes the panels’ efficiency in converting sunlight into electricity. Additionally, factors such as shading from nearby structures or trees can further improve the performance of south-facing panels, as they are less likely to be obstructed during peak sun hours.
What Are the Solar Gains from East and West Facing Panels?
Seasonal variations also play a crucial role, as during summer months, the sun rises earlier and sets later, which may favor one orientation over the other depending on the time of year and regional climate. Therefore, assessing these factors can help determine the best solar panel position to maximize energy gains.
Ultimately, the optimal positioning of solar panels involves a careful analysis of the unique energy requirements of the household, the specific location, and local solar irradiance patterns to achieve the best performance and return on investment.
Why Is North Not Recommended for Solar Panel Installation?
This happens because the northern direction generally receives less sunlight throughout the day compared to other orientations, particularly in the Northern Hemisphere where sunlight is more direct from the south.
According to the U.S. Department of Energy, solar panels installed facing south can capture up to 20% more sunlight than those facing north. This is due to the sun’s path across the sky, which is generally from east to west, with its peak intensity occurring in the southern part of the sky during the day.
The underlying mechanism involves the angle of incidence, which is the angle at which sunlight strikes a surface. Panels facing north experience a less favorable angle of incidence, leading to reduced efficiency in energy absorption. Additionally, in many regions, the seasonal variation in sunlight also affects northern installations, as the sun’s position changes with the seasons, further diminishing solar exposure compared to southern or western orientations.
What Angle Should Solar Panels Be Installed At for Optimal Performance?
Seasonal Adjustments: To optimize energy capture, some installations benefit from adjusting the angle of the panels with the changing seasons. For example, a steeper angle in winter can help gather more sunlight when the sun is lower in the sky, while a flatter angle in summer can capture sunlight more effectively during longer days.
Roof Orientation: The ideal angle for solar panels also depends on the orientation of the roof. South-facing roofs in the Northern Hemisphere generally receive the most sunlight, making them preferable for solar installations, while east or west orientations might require adjustments to the angle for optimal performance.
Fixed vs. Adjustable Mounts: Fixed mounts are set at a specific angle and are simpler to install, but adjustable mounts allow for changes in angle throughout the year, which can enhance efficiency. Although adjustable systems may have a higher upfront cost, they can lead to better performance by optimizing the solar panels’ position relative to the sun’s path.
How Does Shade Affect Solar Panel Efficiency and Positioning?
To maximize efficiency, solar panels should be positioned to avoid shade during peak sunlight hours. This often means assessing the landscape and planning the installation to ensure that no obstacles will create shade, particularly at different times of the year.
The tilt and direction of solar panels should be adjusted to minimize the effects of shade from surrounding objects. By orienting panels towards the sun’s path and adjusting their angle, homeowners can enhance energy capture and reduce the impact of shadows.
These technologies can help mitigate the negative effects of shading by allowing individual panels to operate at their optimal performance. Using microinverters or power optimizers can ensure that even if one panel is partially shaded, it does not affect the entire system’s output, leading to more consistent energy production.
What Tools Can Help Determine the Best Position for Solar Panels?
Several tools can assist in determining the best solar panel position for optimal energy production:
- Solar Path Finder: This tool helps assess the solar potential of a location by analyzing the sun’s path throughout the year.
- SUNMOD: An advanced software that provides detailed modeling of solar radiation and can simulate the effects of shading on solar panel performance.
- PVWatts: A user-friendly online calculator that estimates the energy output of grid-connected solar photovoltaic (PV) systems based on geographical location and panel orientation.
- Solar Angle Calculator: A simple tool that calculates the optimal tilt angle for solar panels based on the latitude of the installation site.
- Mobile Apps (e.g., Solar Measure): These applications allow users to measure solar angles and shading directly on-site using their smartphones or tablets.
Solar Path Finder: This device uses a clear dome filled with a special liquid that captures sunlight and projects it onto a map of the installation area, allowing users to visualize the sun’s path and identify potential obstructions that may cause shading throughout the year. By understanding how shadows will fall on the installation area, users can optimize the placement of their solar panels for maximum sunlight exposure.
SUNMOD: This software is designed for professional use, providing comprehensive simulations of solar energy production based on geographical and environmental data. It takes into account factors such as shading from nearby structures and trees, seasonal changes, and specific solar panel characteristics, allowing for precise modeling of expected energy output and efficiency.
PVWatts: Developed by the National Renewable Energy Laboratory (NREL), this tool is particularly useful for homeowners and small businesses looking to install solar panels. By inputting basic data such as location, panel type, and system size, users can receive estimates of monthly and annual energy production, which helps in selecting the ideal positioning for their panels.
Solar Angle Calculator: This calculator is straightforward but essential, as it determines the best tilt angle for solar panels based on the latitude of the installation site. Proper tilt maximizes solar exposure, which can significantly enhance the efficiency and energy output of the solar panel system.
Mobile Apps (e.g., Solar Measure): These applications utilize the phone’s camera and sensors to measure angles and assess shading quickly and conveniently. Users can walk around their property and gather real-time data about sunlight availability and shading, allowing for immediate adjustments in planning the solar panel layout.
What Common Mistakes Should Be Avoided When Positioning Solar Panels?
When positioning solar panels, avoiding common mistakes is crucial to maximize efficiency and energy output.
- Neglecting Sun Path Analysis: Failing to analyze the sun’s path throughout the year can lead to improper placement of solar panels. Solar panels should be oriented to capture the maximum amount of sunlight during peak hours, which requires understanding seasonal changes in sun position.
- Ignoring Roof Orientation: Placing panels on a roof that is not facing the optimal direction can significantly reduce energy production. Ideally, solar panels should face south in the northern hemisphere and north in the southern hemisphere to harness the most sunlight.
- Overlooking Shade Effects: Installing solar panels in areas that are shaded by trees, buildings, or other structures can drastically diminish their effectiveness. Even partial shading can lead to significant drops in output, so it’s essential to choose a location that receives unobstructed sunlight.
- Improper Tilt Angles: Many homeowners do not adjust the tilt angle of solar panels according to their geographic location, which affects the angle of sunlight hitting the panels. A fixed angle that is not optimized for seasonal variations can result in lower energy capture, so it’s important to set the tilt for maximum exposure.
- Neglecting Local Weather Patterns: Failing to consider local weather conditions, such as frequent rain or snow, can lead to inefficient panel positioning. It’s critical to account for these factors to ensure that solar panels remain clear of debris or snow, which can obstruct sunlight.
- Not Considering Future Changes: Many do not think about potential future obstructions like growing trees or new buildings that might cast shade on the panels. Planning for the long-term environment around the installation site is vital in maintaining optimal performance over the lifespan of the solar panels.