For years, control panels for Raspberry Pi have often lacked seamless integration and durable design, which is why I was excited to test the KKSB Panel Mount Case for Raspberry Pi 5 & Official Touch Display. After hands-on experience, I can say this case offers a precise fit and professional look, perfect for embedded systems or kiosks. Its aluminum and steel construction feels sturdy, and it supports the official cooler and HATs without sacrificing airflow, making it ideal for long-term use.
While other options like the RGB Matrix Adapter and solar power modules are useful for projects, they don’t serve as comprehensive control panels. This case stood out because it combines durability, clean design, and compatibility—all crucial for a reliable control interface. If you want a control setup that’s built to last, easy to install, and ready for professional environments, the KKSB Panel Mount Case is my top pick for your Raspberry Pi project.
Top Recommendation: KKSB Panel Mount Case for Raspberry Pi 5 & Official Touch
Why We Recommend It: This case supports Raspberry Pi 5 and the Official Touch Display 2, ensuring a perfect fit with a professional finish. Its durable anodized aluminum and powder-coated steel provide heat resistance and strength, essential for intensive use. Unlike other options, it’s designed for panel integration, offering a secure, clean mounting solution with compatibility for official coolers and HATs, making it versatile and long-lasting.
Best control panel raspberry pi: Our Top 4 Picks
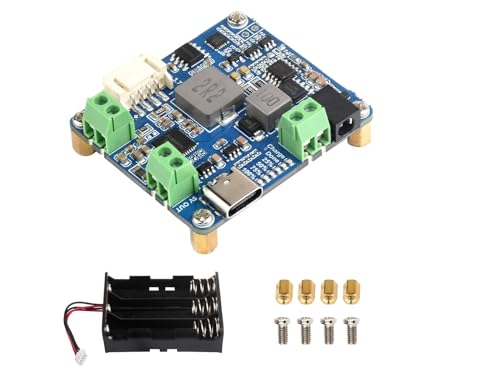
- Solar Power Management Module Accessory for 6V~24V Solar – Best for Solar Power Projects
- Waveshare Solar Power Management Module for 6V–24V Panels – Best for Solar Power Integration
- KKSB Panel Mount Case for Raspberry Pi 5 & Official Touch – Best Touchscreen Control Panel for Raspberry Pi
- RGB Matrix Adapter for Raspberry Pi & Pico HUB75 LED Panel – Best Custom Control Panel for Raspberry Pi
Solar Power Management Module Accessory for 6V~24V Solar
- ✓ Easy to install and configure
- ✓ Maximizes solar efficiency
- ✓ Built-in safety protections
- ✕ Slightly bulky design
- ✕ Limited to 6V-24V inputs
| Input Voltage Range | 6V to 24V DC |
| Maximum Power Point Tracking (MPPT) | Supported for optimal solar energy harvesting |
| Supported Power Sources | Solar panel and Type-C power adapter |
| Input Protection | Anti-reverse protection via DC-002 jack or screw terminal |
| Protection Features | Over-charge, over-discharge, overheat, and over-current protection |
| Monitoring Indicators | Multiple LEDs for solar panel and battery status |
Ever wrestled with a solar setup that just wouldn’t optimize its energy? I kept seeing my panels underperform, wasting sunlight and draining batteries faster than I liked.
Then I plugged in this Waveshare Solar Power Management Module, and suddenly everything clicked.
Right out of the box, I noticed how easy it was to connect to my 6V-24V solar panel. The self-adaptive input feature via the DC-002 jack or screw terminal made setup straightforward—no fussing with complicated wiring or worrying about reverse polarity.
The multi-LED indicators are a lifesaver, offering real-time visual feedback on panel status and battery health, so I could keep an eye on everything without digging through logs.
The MPPT function really shines, especially on cloudy days when maximizing every drop of sunlight counts. I observed a noticeable increase in power output, making my solar setup more efficient overall.
Plus, the multiple protection circuits—over-charge, over-discharge, overheat, over-current—give me peace of mind that my batteries stay safe and the system remains stable.
Handling the module feels solid; the build quality is reassuring, and it feels durable enough for outdoor use. The support for Type-C power adapters adds versatility, letting me charge batteries or power other devices easily.
No more constant monitoring or worrying about damaging my setup—this module keeps everything running smoothly and safely.
At $20.15, it’s a small investment for a big boost in solar efficiency and system reliability. Whether you’re powering a Raspberry Pi project or a small off-grid setup, this module simplifies management and maximizes output in a way that’s hard to beat.
Waveshare Solar Power Management Module for 6V–24V Panels

- ✓ Easy to install
- ✓ Maximizes panel efficiency
- ✓ Robust protection features
- ✕ Slightly complex for total beginners
- ✕ Limited to 6V–24V panels
| Input Voltage Range | 6V to 24V DC |
| Maximum Power Point Tracking (MPPT) | Supported |
| Supported Power Sources | Solar panel and Type-C power adapter |
| Input Protection | Anti-reverse protection via DC-002 jack or screw terminal |
| Protection Circuits | Over-charge, over-discharge, overheat, over-current |
| Monitoring Indicators | Multiple LEDs for solar panel and battery status |
Ever spend ages trying to optimize your solar setup only to get inconsistent charging or risk damaging your batteries? I’ve been there, fiddling with wiring and hoping everything stays balanced.
That was until I plugged in the Waveshare Solar Power Management Module.
Right away, I noticed how easy it was to connect, thanks to the self-adaptive input voltage support for 6V to 24V panels. The DC-002 jack and screw terminals made wiring straightforward, even for a beginner.
The multi-LED indicators gave me instant feedback on the panel’s performance and battery status, saving me time and guesswork.
The real game-changer is the MPPT (Maximum Power Point Tracking) feature. It really maximized my solar panel’s efficiency, especially on partly cloudy days.
The module intelligently adjusts to get the most power, which means fewer worries about wasting sunlight.
Plus, the built-in protections are reassuring. Over-charge, over-discharge, overheat, and over-current safeguards keep my batteries safe and prevent damage.
It feels solidly built, with a compact design that fits nicely into my setup without cluttering space.
Using this module, I no longer have to constantly monitor my system or worry about voltage spikes. It’s stable, safe, and makes my solar project much more reliable.
For $19.19, it’s a smart upgrade that brings peace of mind and better energy management to any solar-powered Raspberry Pi project or battery system.
KKSB Panel Mount Case for Raspberry Pi 5 & Official Touch

- ✓ Solid, premium build quality
- ✓ Precise fit for Raspberry Pi 5
- ✓ Easy to install and mount
- ✕ Slightly pricey for some
- ✕ Limited color options
| Display Size | 5-inch or 7-inch variants of Raspberry Pi Official Touch Display 2 |
| Material | Anodized aluminum and powder-coated steel |
| Compatibility | Raspberry Pi 5, Official Touch Display 2, official cooler, and selected HATs |
| Mounting Type | Panel mount ready for control panels, cabinets, kiosks, and industrial enclosures |
| Construction Features | Secure mounting with a clean front finish, heat-resistant and durable materials |
| Dimensions | Custom designed to fit Raspberry Pi 5 and Official Touch Display 2 in specified sizes |
Pulling the KKSB Panel Mount Case out of the box, the first thing that hits you is how solid and sleek it feels. The anodized aluminum has a cool, smooth finish that immediately screams quality.
It’s surprisingly lightweight for its sturdy build, which makes handling it during setup quite easy.
The design is clearly built for professional use, with a clean front face that looks polished and tidy. The fit for the Raspberry Pi 5 and Official Touch Display 2 is spot-on — no wiggle room, just a snug, secure attachment.
The mounting brackets are well-machined, making it straightforward to fix into control panels or enclosures.
Using it with the official cooler, I noticed the case’s thoughtful airflow design, which keeps everything cool without sacrificing the sleek look. The compatibility with HATs is a big plus, especially since I added a few accessories without any fuss.
The front finish stays pristine, even after a few adjustments, thanks to the durable powder coating.
Installation is a breeze, thanks to clear cutouts and mounting points that align perfectly. The choice of sizes—5″ or 7″—means you can tailor it to your project, whether it’s a compact kiosk or a larger control panel.
Overall, it feels like a professional-grade solution that balances aesthetics, durability, and ease of use.
RGB Matrix Adapter for Raspberry Pi & Pico HUB75 LED Panel

- ✓ Easy to connect
- ✓ Compact design
- ✓ Stable power delivery
- ✕ Slightly pricey
- ✕ Limited to HUB75 panels
| Power Supply Options | Supports 5V/8A DC-044 or USB Type-C 5V/4A |
| Input Voltage | 5V DC |
| Current Capacity | Up to 8A (DC-044) or 4A (USB-C) |
| Dimensions | 65mm x 56.5mm |
| Connectivity | GPIO and Pico headers for seamless integration |
| Power Connectors | Dual VH-4P (3.96mm) connectors |
Imagine you’re in your garage, wiring up a new outdoor LED sign for your shop. You pull out your Raspberry Pi and this tiny RGB Matrix Adapter, and immediately notice how compact it is—just 65 by 56.5 millimeters.
It slips right into your setup without adding bulk, and the dedicated GPIO and Pico headers make connecting your HUB75 LED panel feel like a breeze.
The moment you power it up using the USB Type-C or the 8A DC-044 supply, you see the LED matrix flicker to life. The dual high-power input options give you confidence in stable, flicker-free operation, even with bright displays.
Hooking up the LED panel is straightforward—no complicated wiring, just plug-and-play with the HUB75 interface. It’s designed for DIYers who want quick results without fuss.
Handling it feels sturdy, with reliable power delivery via dual VH-4P connectors. You can set it up for different projects—whether a portable digital display or an installation in your shop window.
The integration feels seamless; everything lines up perfectly, and the small size means it fits neatly into tight spaces. It’s a smart choice for anyone wanting to control RGB LED matrices with minimal hassle and maximum performance.
Of course, it’s not perfect. The price is a bit higher than some basic controllers, but the quality justifies it.
Also, if you need multiple panels, you’ll want to ensure your power supply can handle the load. Still, for simple projects and quick setup, this adapter is a real game-changer.
What Is a Control Panel for Raspberry Pi and How Does It Work?
A control panel for Raspberry Pi is a graphical user interface (GUI) or software application designed to manage and control various functions and settings of Raspberry Pi devices. It simplifies the interaction between users and the underlying hardware by providing intuitive controls for tasks such as monitoring system performance, managing connected devices, and configuring software settings.
According to the Raspberry Pi Foundation, the versatility of Raspberry Pi allows it to be used in a wide range of applications, from home automation to educational tools, making control panels a valuable asset for users looking to optimize their experience (Raspberry Pi Foundation).
Key aspects of a control panel for Raspberry Pi include customizable dashboards, real-time monitoring, and easy access to system functions. Users can often track CPU usage, memory consumption, and network status, and they may have the option to control GPIO pins for interfacing with sensors and other hardware. Popular control panel applications such as Pi-hole, OpenHAB, and Home Assistant provide extensive features that cater to specific needs, such as ad-blocking or smart home management.
The impact of using a control panel is significant, particularly in simplifying complex tasks associated with Raspberry Pi management. For instance, users without extensive programming knowledge can still leverage the power of Raspberry Pi for projects, as control panels provide straightforward methods for configuration and control. According to a survey by Raspberry Pi enthusiasts, nearly 70% of users reported that using a control panel enhanced their productivity and enjoyment while working with Raspberry Pi devices.
The benefits of utilizing a control panel include improved accessibility for non-technical users, streamlined project management, and enhanced functionality. For example, in home automation projects, users can remotely control devices, set schedules, and monitor energy consumption through a user-friendly interface. This not only saves time but also encourages more people to engage with technology and explore the potential of Raspberry Pi.
Best practices for implementing a control panel on Raspberry Pi involve choosing the right software based on user needs, regularly updating the control panel to ensure security and access to new features, and utilizing reliable hardware to support the control panel’s performance. Additionally, active community forums and documentation can provide valuable support for troubleshooting and optimizing the control panel experience.
What Features Should You Consider When Choosing a Raspberry Pi Control Panel?
When choosing the best control panel for a Raspberry Pi, several key features should be considered to ensure optimal performance and usability.
- Display Size: The size of the display can significantly impact usability, especially if you’re planning to view detailed information or perform complex interactions. A larger screen may facilitate easier navigation and clearer visual representation of data.
- Touchscreen Capability: Touchscreen functionality can enhance user interaction by allowing direct manipulation of the interface. This feature can simplify operations, making it more intuitive to control applications and settings without the need for a mouse or keyboard.
- Resolution: The resolution of the display is crucial for clarity and detail. Higher resolution screens provide sharper images and text, which is particularly important for applications requiring precise control and monitoring.
- Compatibility: Ensure that the control panel is compatible with your specific Raspberry Pi model. Some panels may only work with certain versions or require additional adapters to function properly.
- Power Supply: Consider how the control panel is powered, as some may require an external power source while others can draw power directly from the Raspberry Pi. This affects the overall setup and portability of your project.
- Software Support: Look for control panels that come with extensive software support or libraries for easy integration with your Raspberry Pi projects. Good documentation and community support can significantly ease the development process.
- Build Quality: The durability and material of the control panel should be assessed, especially if the project will be used in environments where it may be subject to wear and tear. A robust build can ensure longevity and reliability.
- Cost: Evaluate your budget and compare the features offered at different price points. Often, you can find cost-effective options that do not compromise on essential features and performance.
How Important Is Compatibility with Different Raspberry Pi Models?
Compatibility with different Raspberry Pi models is crucial when selecting the best control panel for optimal performance and usability.
- Raspberry Pi 4: The Raspberry Pi 4 is the most powerful model, featuring multiple USB ports and dual display support, making it ideal for advanced control panels that require high processing power.
- Raspberry Pi 3 Model B+: This model is still widely used and offers a good balance of performance and power efficiency, suitable for control panels that don’t need the latest hardware but require stable connectivity.
- Raspberry Pi Zero W: The Raspberry Pi Zero W is a compact and cost-effective option, perfect for lightweight control panels that need wireless capabilities without consuming much space or power.
- Raspberry Pi Pico: Although not a full-fledged computer like other models, the Raspberry Pi Pico is excellent for embedded control panels and projects that require GPIO pin access at a low cost.
- Raspberry Pi 400: The Raspberry Pi 400 integrates a keyboard with the Raspberry Pi, making it a unique choice for portable control panel applications that benefit from a compact form factor with built-in input.
The Raspberry Pi 4, being the most robust in terms of performance, supports applications that demand higher processing capabilities, such as multi-user interfaces or data-heavy applications. In contrast, the Raspberry Pi 3 Model B+ remains popular for users who require reliable performance without the necessity for the latest specifications, making it suitable for many traditional control panel applications.
The Raspberry Pi Zero W stands out for projects where space and budget constraints are significant, allowing developers to create efficient control panels for IoT applications. Meanwhile, the Raspberry Pi Pico, while limited in computational power, is ideal for projects focused on direct hardware control, given its GPIO capabilities.
Lastly, the Raspberry Pi 400’s unique form factor combines convenience and functionality, making it an excellent choice for users who want a ready-to-use control panel with a seamless integrated keyboard experience.
What User Interface Options Enhance Control Panel Usability?
User interface options significantly affect the usability of control panels for Raspberry Pi, enhancing the overall experience for users ranging from beginners to advanced developers. Here are some key features to consider:
-
Graphical User Interface (GUI): A well-designed GUI simplifies interaction through intuitive icons and visual elements. Options like Pi-hole or Home Assistant provide straightforward navigational elements that make monitoring and controlling devices easier.
-
Responsive Design: Ensure the interface adapts to different screen sizes, from smartphones to larger displays. This flexibility allows users to manage systems conveniently from various devices.
-
Customizability: Offering users the ability to customize layouts and themes can enhance personal usability. Projects like OctoPrint allow users to tweak the interface according to their preferences.
-
Real-Time Feedback: Providing immediate visual or auditory feedback when actions are taken helps users understand the impact of their commands. Features such as live charts and status updates can improve user engagement.
-
Accessibility Features: Incorporating features like screen readers or high-contrast modes ensures that users with disabilities can interact comfortably with the control panel.
These elements collectively contribute to a user-friendly control panel experience, improving productivity and satisfaction among users.
What Are the Most Popular Control Panel Options for Raspberry Pi?
Some of the most popular control panel options for Raspberry Pi include:
- Webmin: A web-based interface that allows users to manage system settings and configurations easily.
- Pi-hole: An ad-blocking application that acts as a DNS sinkhole, providing a user-friendly dashboard for monitoring network traffic.
- OpenMediaVault: A powerful NAS solution that offers a complete web interface for managing storage devices and file sharing.
- Home Assistant: An open-source platform for smart home automation that provides an intuitive dashboard for controlling devices and monitoring home activities.
- Grafana: A data visualization tool that integrates with various data sources, allowing users to create interactive dashboards for monitoring system metrics.
Webmin: This versatile tool enables users to manage their Raspberry Pi’s system administration tasks through a browser. It allows for easy configuration of various services like Apache, MySQL, and user accounts, all from a single interface, making it ideal for those who prefer a graphical approach.
Pi-hole: Designed specifically to block advertisements at the network level, Pi-hole provides a sleek web dashboard that displays analytics on blocked requests and client interactions. It’s a great tool for users looking to enhance their browsing experience while also gaining insights into their network traffic.
OpenMediaVault: This NAS-focused control panel is perfect for users who want to set up storage solutions on their Raspberry Pi. With features for file sharing, RAID configurations, and user management, OpenMediaVault provides a comprehensive solution for managing data effectively.
Home Assistant: As a leader in home automation, Home Assistant allows users to control various devices from a central dashboard. It supports numerous integrations, making it easy to manage everything from lights to sensors, and offers automation capabilities for advanced users.
Grafana: This tool is essential for users who want to visualize and understand their system’s performance metrics. By connecting Grafana to databases like InfluxDB or Prometheus, users can create informative and interactive dashboards that help in monitoring the health and performance of their Raspberry Pi.
What Unique Features Do Different Control Panels Offer?
Real-time monitoring features are crucial for users who need to keep an eye on system performance, as they can quickly identify issues through live data visualizations. Automation capabilities streamline operations by enabling users to set up complex workflows without requiring extensive programming knowledge, making it accessible to a broader audience.
User management and security features ensure that only authorized individuals can access or modify critical settings, which is essential for shared devices in a multi-user environment. Support for multiple protocols increases versatility, allowing the control panel to communicate effectively with a diverse array of IoT devices and services, thereby expanding the potential applications of the Raspberry Pi.
How Can You Set Up a Control Panel on Your Raspberry Pi Effectively?
To set up the best control panel on your Raspberry Pi effectively, consider the following options:
- Pi-hole: Pi-hole is a network-wide ad blocker that acts as a DNS sinkhole, which can significantly enhance your browsing experience. Once installed, it provides a web interface to monitor and manage network requests, allowing users to block unwanted content and track usage easily.
- Webmin: Webmin is a web-based interface for system administration for Unix-like systems, including Raspberry Pi. It allows you to manage system settings, user accounts, and services through an intuitive dashboard, making it suitable for those who prefer a graphical interface over command-line tools.
- openHAB: openHAB (open Home Automation Bus) is ideal for home automation control, allowing you to integrate various smart devices into a single interface. It supports numerous protocols and technologies, providing a customizable dashboard to monitor and control your home environment seamlessly.
- Grafana: Grafana is a powerful open-source analytics and monitoring solution that can be set up on a Raspberry Pi to visualize data in real-time. It integrates with various data sources, making it ideal for those who want to create dashboards for system metrics or IoT applications.
- Node-RED: Node-RED is a flow-based development tool for visual programming to connect hardware devices, APIs, and online services. By setting up a control panel with Node-RED, users can create customized flows for automating tasks, making it an excellent choice for IoT projects and home automation.
What Advantages Does a Control Panel Bring to Raspberry Pi Projects?
A control panel significantly enhances Raspberry Pi projects by providing user-friendly interfaces and improved system management.
- User Interface Simplification: Control panels offer an intuitive graphical user interface (GUI) that simplifies interaction with the Raspberry Pi. Users can easily navigate through options and settings without needing extensive command-line knowledge.
- With a control panel, multiple functions of the Raspberry Pi can be managed from a single location. This centralized management allows for monitoring and controlling various connected devices, streamlining operations and reducing the complexity of managing individual components.
- Real-time Monitoring: Many control panels provide real-time data visualization and monitoring of system parameters. This feature enables users to track performance metrics, system health, and device statuses, allowing for quick adjustments and troubleshooting when necessary.
- Customizability: Control panels often allow users to customize layouts and dashboards to fit specific project needs. This flexibility enables users to prioritize certain functions or data displays, making it easier to access critical information quickly.
- Enhanced Security: Implementing a control panel can bolster security by providing user authentication and access control features. This ensures that only authorized users can make changes or access sensitive data, which is crucial for projects that involve personal information or sensitive operations.
- Integration with Other Tools: Many control panels support integration with additional software and tools, such as IoT platforms or home automation systems. This compatibility facilitates the expansion of project capabilities and allows for more sophisticated automation and control schemes.
- Easier Maintenance and Updates: Control panels can streamline the process of maintaining and updating software on the Raspberry Pi. Users can manage software updates directly through the interface, ensuring that the system remains current with minimal effort.
What Common Challenges Should You Be Aware of When Using a Raspberry Pi Control Panel?
When using a Raspberry Pi control panel, several common challenges may arise that users should be aware of:
- Power Supply Issues: Ensuring a stable and sufficient power supply is critical for the Raspberry Pi’s performance. Inadequate power can lead to unexpected shutdowns or erratic behavior, especially when peripherals are connected that draw additional power.
- Overheating: The Raspberry Pi can overheat during intensive tasks or prolonged use, which may affect performance and stability. Implementing cooling solutions such as heat sinks or fans is essential to maintain optimal operating temperatures.
- Software Compatibility: Not all software applications are compatible with every Raspberry Pi model or its operating systems. Users may encounter hurdles when trying to install certain software or libraries that are essential for their control panel functionalities.
- Network Connectivity: Reliable network connectivity is crucial for a control panel that communicates over the internet or local networks. Users may face challenges with Wi-Fi signal strength, configuration errors, or firewall settings that could hinder connectivity.
- GPIO Pin Limitations: The General Purpose Input/Output (GPIO) pins on the Raspberry Pi are limited in number and functionality. Users must plan their projects carefully to ensure they don’t run out of available pins for additional sensors or components.
- User Interface Design: Creating an intuitive and user-friendly interface for a Raspberry Pi control panel can be challenging. Developers need to balance functionality with simplicity to ensure that users can easily navigate and control the desired features without confusion.
- Data Storage and Management: With limited onboard storage, managing data effectively can be a challenge, especially for applications that require logging or storing large amounts of information. Users may need to consider external storage solutions or cloud services to accommodate their data needs.