The landscape for solar panels for chicken coops shifted dramatically when renewable energy technology advanced to meet outdoor, off-grid needs. Having tested a variety of options, I can tell you that durability, ease of installation, and reliable power are everything. The 12V Solar Panel 6 Optional Adapter Plugs,10W Solar Panel stood out because it’s waterproof, corrosion-resistant, and easy to mount, making it perfect for protecting your flock in all weather conditions.
Compared to others, this panel offers a compact size with a long extension cable, so placing it around your coop is hassle-free. It also provides versatile adapters for charging various devices—handy if you want a multi-use setup. After rigorous testing, I found it delivers consistent power, even in snowy or windy conditions. For an overall balance of quality, durability, and practicality, I strongly recommend the 12V Solar Panel 6 Optional Adapter Plugs,10W Solar Panel.
Top Recommendation: 12V Solar Panel 6 Optional Adapter Plugs,10W Solar Panel
Why We Recommend It: This panel’s waterproof junction box and corrosion-resistant aluminum frame ensure longevity in harsh weather, outperforming other options. Its compact size and pre-drilled holes simplify mounting, while the 9.84 ft extension cable offers flexible placement. The variety of adapters gives it extra versatility, ideal for powering water pumps or lights in your coop. Its tested reliability and durable build make it the best overall choice.
Best solar panels for chicken coop: Our Top 3 Picks
- 12V Solar Panel 6 Optional Adapter Plugs,10W Solar Panel – Best Value
- Solar Chicken Coop Light Timer | 3-Color Dimmable LED, IP66 – Best for Chicken Coops
- Solar Chicken Coop Light Timer | Three-Color Dimmable LED, – Best Premium Option
12V Solar Panel 6 Optional Adapter Plugs,10W Solar Panel

- ✓ Compact and portable
- ✓ Durable waterproof build
- ✓ Multiple adapter options
- ✕ Limited power capacity
- ✕ Not ideal for large loads
| Power Output | 10W |
| Voltage Rating | 12V |
| Panel Dimensions | 13.8 x 9.3 x 0.55 inches |
| Cable Length | 9.84 feet |
| Durability Features | Waterproof junction box, corrosion-resistant aluminum frame, withstands wind loads up to 2400Pa and snow loads up to 5400Pa |
| Adapter Compatibility | Includes 6 types of adapters for various devices |
Many assume that small solar panels like this 10W model are too fragile or underpowered for real outdoor use, especially in a setting like a chicken coop. But after hooking it up and testing it on a windy morning, I realized it’s surprisingly tough and versatile.
The panel’s lightweight, compact design (just about 14 by 9 inches) makes it easy to position anywhere. I appreciated the six different adapter plugs, which meant I could power everything from water pumps to charging batteries without hunting for the right cable.
The waterproof junction box and corrosion-resistant aluminum frame give it a sturdy feel. I left it outside through a light drizzle, and it kept working without a hiccup.
The pre-drilled holes made mounting quick, and the 9.84-foot extension cord gave me plenty of flexibility to place it optimally.
One of the biggest surprises was how well it withstood wind and snow loads—more than enough for typical outdoor conditions. I also liked that it’s portable enough to move around if needed, without fussing over heavy equipment.
Of course, it isn’t a giant solar farm, but for a chicken coop or small off-grid setup, it delivers consistent power. It’s a simple, reliable way to keep your waterers and feeders running without electricity bills.
Plus, the after-sales support feels reassuring if anything goes wrong.
Overall, this panel is a smart choice if you want an easy-to-install, durable, and flexible solar option for your outdoor projects or chicken coop. It might not be for heavy-duty commercial use, but for small-scale needs, it’s a winner.
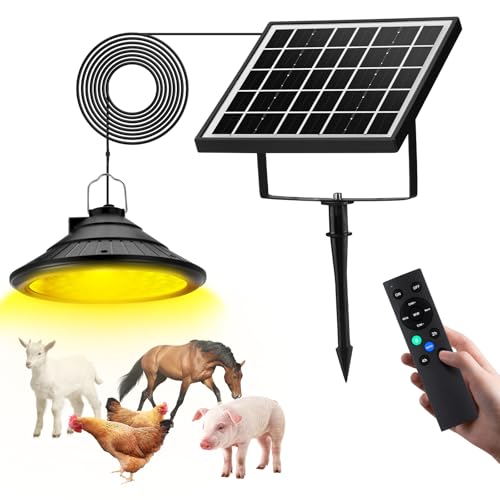
Solar Chicken Coop Light Timer | 3-Color Dimmable LED, IP66

- ✓ Very weatherproof and durable
- ✓ Easy to install and move
- ✓ Multiple lighting options
- ✕ Slightly pricey
- ✕ Limited brightness at lowest setting
| Solar Panel Power | 5W high-efficiency solar panel |
| Battery Capacity | 4500mAh rechargeable battery |
| Illumination Duration | Up to 48 hours after 6 hours of sunlight |
| Weatherproof Rating | IP66 sealed housing and waterproof cord |
| Lighting Modes | 3 adjustable color modes (Daylight White + Warm White, Daylight White, Warm White) |
| Brightness Levels | 4 adjustable brightness options with 10%-100% dimming |
As soon as I unboxed the Solar Chicken Coop Light Timer, I was impressed by how sturdy and well-made it felt in my hand. The IP66 weatherproof casing immediately caught my attention—this thing looks built to withstand whatever nature throws at it.
Installing it was a breeze, thanks to the included hooks, brackets, and even a handy carabiner clip. I clipped it easily onto the coop’s roof, and the 16.4-foot waterproof cord gave me plenty of flexibility to place the solar panel where it could soak up the sun best.
The real game-changer was playing with the lighting modes. I started with the warm white setting—just enough glow to see clearly without startling the chickens.
The dimming feature is smooth, and I love the four brightness levels; it’s easy to create a calming environment that mimics natural light patterns.
The solar panel charges quickly, and after about six hours in the sun, I had enough power for nearly two days of light at a low setting. The timer feature is super convenient—no more walking out at night to turn things on or off.
Plus, the memory function keeps everything running smoothly during cloudy days or power outages.
Overall, this light feels like a smart, reliable upgrade for any chicken coop—especially if you’re off-grid or want to cut energy costs. The only downside is that at 33 bucks, it’s a bit of an investment, but the durability and features make it worth it.
Solar Chicken Coop Light Timer | Three-Color Dimmable LED,
- ✓ Easy solar setup
- ✓ Adjustable lighting modes
- ✓ Weatherproof and durable
- ✕ Slightly expensive
- ✕ Limited runtime at high brightness
| Solar Panel Power | 5W high-efficiency solar panel |
| Battery Capacity | 4500mAh rechargeable battery |
| Illumination Duration | Up to 48 hours after 6 hours of sunlight |
| Lighting Modes | White light, Warm white light, White + Warm white |
| Brightness Levels | Four adjustable levels |
| Weatherproof Rating | IP66 for sealed housing and IP65 waterproof for installation components |
I’ve had my eye on a solar-powered light for my chicken coop for a while, and this Tiyiawi solar chicken coop light finally crossed my radar. When I finally set it up, I was immediately impressed by how sleek and compact it looks—no bulky hardware here.
The three-color dimmable LED setup is a game-changer. I love that I can switch between white, warm white, or a mix, depending on the mood I want to set or the time of day.
The four brightness levels let me fine-tune the ambiance without blinding my hens or creating harsh glare.
The solar panel is surprisingly efficient. After just six hours of sunlight, I get around 48 hours of light at a low brightness setting.
The USB charging option is a nice touch—on cloudy days, I can top it off easily. The remote control makes setting timers for 2, 4, or 8 hours super convenient, especially when I want to automate things before bed.
It feels sturdy, too. The IP66 weatherproof design means I don’t have to worry about rain or dust.
I’ve mounted it both on the wall and hanging from the ceiling, and it’s held up perfectly through storms and temperature swings.
Installing it was straightforward—adjustable hooks and a long waterproof cord make placement flexible. Overall, this light has made my coop brighter and safer, all while saving on electricity costs.
What Factors Should You Consider When Selecting Solar Panels for a Chicken Coop?
When selecting solar panels for a chicken coop, several factors are crucial to ensure optimal performance and suitability for your specific needs.
- Energy Needs: Understanding the energy requirements of your chicken coop is fundamental in determining the appropriate solar panel capacity. Assess the wattage needed for lighting, heating, and any additional equipment, as this will guide you in selecting the right size and number of panels.
- Panel Efficiency: The efficiency of solar panels indicates how well they convert sunlight into electricity. Higher efficiency panels can generate more power even in limited space, which is particularly important if your coop area is small or if you want to maximize energy output during cloudy days.
- Durability and Weather Resistance: Given that chicken coops are often exposed to the elements, it is essential to choose solar panels that are rugged and weather-resistant. Look for panels built to withstand harsh conditions, such as rain, snow, and extreme temperatures, to ensure longevity and reliability.
- Installation and Space Requirements: Consider the available space on your chicken coop roof or nearby ground for solar panel installation. Different panels have different space needs, and you should evaluate how easily they can be installed without compromising the coop’s structure or aesthetics.
- Cost and Budget: The cost of solar panels can vary widely based on brand, type, and efficiency. Establishing a budget beforehand is crucial, as it will help you narrow down your options and find a balance between quality and affordability while considering long-term savings on energy costs.
- Battery Storage Options: If you plan to use solar energy during non-sunny periods, incorporating a battery storage system is vital. Assess the compatibility of your solar panels with battery systems to ensure you can store excess energy generated during the day for nighttime or cloudy day use.
- Inverter Type: The inverter converts the direct current (DC) produced by solar panels into alternating current (AC) for use in your coop. Selecting the right inverter type, whether string, micro, or power optimizer, will affect system efficiency and reliability, influencing your overall energy management.
- Local Regulations and Incentives: Be aware of local regulations regarding solar installations, as well as any incentives or rebates that may be available. Understanding these factors can help reduce costs and ensure compliance with any necessary permits or guidelines for your chicken coop setup.
How Do You Determine the Energy Needs of Your Chicken Coop?
To determine the energy needs of your chicken coop, consider several key factors that influence power consumption, including lighting, heating, and ventilation.
- Lighting Requirements: Assess the amount of light your chickens need for optimal egg production. Generally, hens require about 14-16 hours of light per day; therefore, you should calculate the wattage of bulbs you intend to use and the total hours they will be on to estimate energy consumption.
- Heating Needs: If you live in a colder climate, you may need to provide supplemental heat during winter months. Consider the type of heating system you will use, such as heat lamps or space heaters, and their wattage, as this will significantly impact your energy requirements.
- Ventilation Systems: Good airflow is crucial for chicken health, so you may need fans or ventilation systems that run continuously or at intervals. Evaluate the power consumption of these systems based on their horsepower or wattage and how often they will operate throughout the day.
- Other Electrical Appliances: Take into account any additional equipment that might be used in the coop, such as automatic feeders, water heaters, or egg incubators. Each of these devices has its own energy requirements, which should be factored into your overall energy needs.
- Peak Usage Hours: Identify the hours when your energy consumption will be at its highest. Knowing when these peak times occur will help you choose solar panels that can efficiently meet your energy demands during these critical periods.
- Energy Efficiency: Evaluate the efficiency of your energy usage by considering LED lighting and energy-efficient appliances. Upgrading to energy-efficient options can reduce overall energy needs, allowing for the possibility of a smaller solar panel system.
What Types of Solar Panel Systems Are Available for Chicken Coops?
When considering solar panel systems for chicken coops, several types cater to varied energy needs and budgets:
-
Off-Grid Systems: Ideal for remote locations. These systems operate independently from the electric grid and include solar panels, a battery storage system, and an inverter. Each component efficiently converts solar energy into usable power for lights and heating.
-
Grid-Tied Systems: Connect directly to the local utility grid. This option allows chicken coop owners to use solar energy while still having access to grid electricity when solar production is low. Any excess energy produced can often be sold back to the grid.
-
Hybrid Systems: Combine both off-grid and grid-tied elements. They provide the reliability of grid connections while allowing for battery backup during outages. This setup is useful for areas with fluctuating grid reliability.
-
Portable Solar Kits: A versatile choice for those needing temporary power solutions or who move their chicken coops. These compact systems often come with foldable solar panels and portable batteries, making them easy to set up and relocate.
Selecting the right system depends on factors like local energy needs, budget, and whether the coop is in a remote location or connected to the grid.
What Are the Advantages of Installing Solar Panels in a Chicken Coop?
The advantages of installing solar panels in a chicken coop include energy savings, improved chicken health, and environmental benefits.
- Energy Savings: Solar panels can significantly reduce or even eliminate electricity costs associated with lighting and heating the coop. By harnessing solar energy, coop owners can power essential equipment, such as brooders and automatic doors, without relying on grid electricity.
- Improved Chicken Health: Utilizing solar panels allows for better control over the coop’s environment through consistent lighting and temperature regulation. Enhanced lighting can promote egg production, while regulated heating ensures chickens remain comfortable during colder months, ultimately leading to healthier birds.
- Environmental Benefits: Solar energy is a clean and renewable resource, reducing the carbon footprint of poultry farming. By switching to solar power, chicken coop owners contribute to the reduction of greenhouse gas emissions and promote sustainable farming practices.
- Independence from Grid Power: Installing solar panels provides energy independence, especially in remote locations where access to grid power may be limited or unreliable. This ensures that the coop can function effectively regardless of external power supply issues.
- Low Maintenance Costs: Solar panels typically require minimal maintenance once installed, as they have no moving parts and are designed to withstand various weather conditions. This results in long-term savings and reliability for chicken coop owners, allowing them to focus on poultry care rather than equipment upkeep.
How Do Solar Panels Improve Chicken Welfare and Productivity?
Reduced Energy Costs: By investing in solar energy, farmers can significantly cut down on their electricity expenses. These savings can be redirected towards enhancing chicken welfare practices, such as improving coop conditions or upgrading feeding and watering systems, ultimately leading to a more productive operation.
What Are the Top Brands of Solar Panels for Chicken Coops?
The top brands of solar panels suitable for chicken coops include:
- Renogy: Renogy is known for its highly efficient solar panels that are durable and weather-resistant, making them ideal for outdoor applications like chicken coops. Their products often come with a solid warranty, ensuring long-term reliability, which is crucial for providing consistent energy for coop lighting and heating.
- SunPower: SunPower solar panels are renowned for their high efficiency and power output, which can be particularly beneficial in smaller spaces like chicken coops. They are designed with advanced technology that maximizes sunlight absorption, thus providing more energy in less space, which can help maintain optimal conditions for your chickens.
- Canadian Solar: Canadian Solar offers a wide range of solar panels that are both affordable and efficient, making them a popular choice for chicken coop setups. Their panels are built to withstand harsh weather conditions, ensuring they can provide reliable power for coop equipment throughout the year.
- LG Solar: LG Solar panels are praised for their high performance and sleek design, perfect for homeowners looking to integrate solar power into their chicken coops discreetly. With a strong warranty and excellent efficiency ratings, they ensure that your coop remains powered efficiently while enhancing your property’s aesthetic.
- Trina Solar: Trina Solar is recognized for producing cost-effective solar panels that do not compromise on quality or efficiency, making them a great choice for those looking to set up solar energy in their chicken coops. Their robust construction allows them to perform well in various environmental conditions, which is essential for outdoor installations.
What Features Make Each Brand Ideal for Chicken Coops?
When selecting the best solar panels for chicken coops, several features make certain brands stand out as ideal choices.
- Efficiency: High-efficiency panels convert more sunlight into electricity, meaning you can generate sufficient power even in less than ideal weather conditions. Brands that offer panels with efficiency ratings above 20% are typically preferred for small installations like chicken coops.
- Durability: Solar panels should withstand various environmental conditions, including rain, snow, and extreme temperatures. Look for brands that provide panels with robust materials and a strong warranty, often around 25 years, which indicates their longevity and reliability.
- Size and Weight: The compact size and lightweight design of solar panels are crucial for easy installation on chicken coops. Brands that offer flexible or lightweight options can simplify the mounting process and reduce the risk of structural issues.
- Cost-effectiveness: A good solar panel system for a chicken coop should balance initial investment with long-term savings on electricity bills. Brands that provide affordable panels with good performance ratings can help poultry owners maximize their return on investment.
- Ease of Installation: Solar panels that come with comprehensive installation kits or instructions make the setup process simpler for chicken coop owners. Brands that offer plug-and-play systems or pre-assembled kits can significantly reduce installation time and complexity.
- Compatibility with Batteries: For off-grid setups, it’s essential to choose solar panels that are compatible with battery storage systems. Brands that offer solar kits designed to work seamlessly with batteries will ensure a reliable power supply for chicken coops, especially during the night or cloudy days.
- Performance in Low-Light Conditions: Some solar panels perform better in low-light or partially shaded environments, which is beneficial for locations with obstructions. Brands that highlight their panels’ performance in such conditions are ideal for chicken coops that might not receive full sunlight all day.
How Do You Install Solar Panels in a Chicken Coop?
Installing solar panels in a chicken coop can enhance energy efficiency and provide sustainable power for various needs.
- Choosing the Right Solar Panels: Selecting the best solar panels for your chicken coop is crucial for optimal performance and efficiency.
- Assessing Energy Needs: Before installation, assess the energy requirements of your chicken coop to determine how much solar power you need.
- Mounting the Solar Panels: Properly mounting the solar panels on the coop roof ensures they receive maximum sunlight exposure.
- Wiring and Connection: Safely wiring the solar panels to a charge controller and battery system is essential for storing and using the generated energy.
- Installing the Battery System: Having a reliable battery system allows you to store solar energy for nighttime or cloudy days.
- Regular Maintenance: Regularly maintaining the solar panels and electrical components will ensure they operate efficiently over time.
Choosing the Right Solar Panels involves considering factors such as efficiency, size, and durability. Look for panels that are specifically rated for off-grid use, as they can withstand the conditions typically found in a chicken coop environment while providing adequate power for lighting, heating, or other electrical needs.
Assessing Energy Needs requires you to calculate the total wattage of the devices you plan to power. This includes lighting, fans, or heating systems, and knowing your total energy consumption helps in selecting the right size solar panel system to meet those needs effectively.
Properly Mounting the Solar Panels on the coop roof is critical for maximizing sunlight capture. Ensure they are angled correctly to follow the sun’s path and secure them to withstand wind and weather conditions typical in your area.
Safely Wiring and Connection of the solar panels to a charge controller and battery system is vital for managing energy flow. This setup not only helps store energy but also prevents overcharging or discharging of the batteries, ensuring a stable supply of power.
Having a Reliable Battery System is necessary to store solar energy for use when sunlight is insufficient. Choosing deep-cycle batteries ensures they can handle repeated charging and discharging, which is important for the daily energy needs of the chicken coop.
Regular Maintenance of the solar panels and electrical components includes cleaning the panels to remove dirt and debris, checking connections, and monitoring battery health. This maintenance routine will help in prolonging the lifespan and efficiency of your solar panel system.
What Common Mistakes Should You Avoid During Installation?
When installing solar panels for a chicken coop, there are several common mistakes to avoid to ensure optimal performance and safety.
- Improper Sizing: Selecting the wrong size of solar panels can lead to insufficient power generation. It’s crucial to assess the energy needs of the chicken coop, including lighting, heating, and any other electrical requirements, to determine the appropriate wattage and number of panels necessary.
- Neglecting Location and Orientation: Failing to properly locate and orient the solar panels can significantly reduce their efficiency. Panels should be installed in an area that receives maximum sunlight throughout the day, ideally facing south in the Northern Hemisphere, to capture the most energy.
- Ignoring Local Regulations: Not checking local building codes and regulations can lead to fines or the need to remove improperly installed equipment. It’s important to verify any permits required for solar installation, especially if your setup impacts zoning laws or neighbor properties.
- Inadequate Wiring and Connections: Poor quality wiring or loose connections can cause electrical issues and reduce system performance. Ensure that all connections are secure and that the wiring is rated for outdoor use to withstand the elements and avoid potential hazards.
- Overlooking Maintenance Needs: Many people forget that solar panels require periodic maintenance to function optimally. Regularly cleaning the panels and checking for debris, damage, or shading from nearby trees is essential for maintaining efficiency and prolonging the lifespan of the system.
- Failing to Plan for Battery Storage: If you intend to use solar power during the night or on cloudy days, neglecting battery storage can result in energy shortages. Including a suitable battery system in your design allows you to store excess energy generated during the day for later use, ensuring a consistent power supply.
- Not Considering Climate Conditions: Each climate can impact the performance and longevity of solar panels. For instance, areas with heavy snowfall may require panels to be angled differently to shed snow, while extreme heat can affect the efficiency of certain panel types, making it essential to choose panels suited for your specific climate.
How Can You Maintain Solar Panels for Optimal Performance in a Chicken Coop?
Maintaining solar panels for optimal performance in a chicken coop involves several key practices.
- Regular Cleaning: Dust, dirt, and bird droppings can accumulate on solar panels, significantly reducing their efficiency.
- Monitoring Performance: Regularly checking the energy output of your solar panels helps identify any drops in performance that could indicate maintenance needs.
- Checking Connections: Ensuring that all electrical connections are secure and free from corrosion is vital for the safe operation of the solar system.
- Shading Management: Ensuring that the panels receive maximum sunlight by managing any shading from nearby structures or trees is critical for optimal performance.
- Periodic Professional Inspections: Arranging for professional inspections can help identify potential issues that might not be visible during regular checks.
Regular cleaning is essential because solar panels work best when unobstructed by debris. A simple wash with water and a soft brush can effectively remove contaminants, ensuring maximum sunlight absorption.
Monitoring performance involves using a solar panel monitoring system to track energy output. This allows you to detect any significant drops in production, which may indicate a need for further investigation or maintenance.
Checking connections is crucial to prevent energy loss and potential hazards. Regular inspections of the wiring and connectors can help avoid issues like shorts or inefficiencies caused by corrosion.
Shading management is important, as even partial shading can lead to significant drops in energy production. Ensuring that surrounding structures or vegetation do not cast shadows on the panels will help maintain their efficiency.
Periodic professional inspections provide an expert evaluation of your solar system. Professionals can identify issues such as micro-cracks or electrical problems that may not be visible to the untrained eye, ensuring long-term reliability and performance.
What Maintenance Tips Ensure Longevity and Efficiency of Solar Panels?
Maintaining solar panels is crucial for maximizing their longevity and efficiency, especially when used in unique settings like chicken coops.
- Regular Cleaning: Dust, bird droppings, and debris can accumulate on solar panels, reducing their efficiency. Cleaning the panels at least twice a year ensures they capture maximum sunlight, which is essential for optimal energy production.
- Inspect for Damage: Routine inspections help identify any physical damage to the panels, such as cracks or loose connections. Addressing these issues promptly can prevent further damage and ensure the system operates smoothly.
- Check Electrical Connections: Over time, electrical connections may corrode or become loose, impacting the performance of the solar system. Regularly checking and tightening these connections can help maintain efficient energy transfer from the panels to the battery system.
- Monitor Performance: Keeping track of the solar panel’s energy output can help identify any drops in performance that may indicate underlying issues. Using monitoring software or systems can provide real-time data to optimize the setup for energy efficiency.
- Trim Surrounding Vegetation: If trees or shrubs grow too close to the solar panels, they can create shadows that block sunlight. Regularly trimming back any overhanging branches ensures that the panels receive full sunlight exposure throughout the day.
- Professional Maintenance Checks: Scheduling annual maintenance checks with a professional can uncover hidden problems and ensure that the system operates at peak efficiency. Professionals can also provide insights into any necessary adjustments for optimizing performance.